
1. 背景
因为 DDNS-GO 接入了阿里云的 DDNS 服务, 会出现频繁的调用配置的 URL 去获取公网 IP 并更新到阿里云, 如果部分 IP 查询网站设置了请求限制, 将导致我的域名失效.
因此考虑使用 Nginx 来搭建一个获取公网 IP 的服务, 用来给 DDNS-GO 使用.
2. 使用 Nginx
在网上查询资料后, 只需要对 Nginx 进行简单的配置即可:
server {
    listen 8000;
    listen [::]:8000;
    server_name ip.xxx ip.yyy;
    server_tokens off;

    location = /ip {
        add_header Content-Type text/plain;
        access_log off;
        return 200 "$remote_addr\n";
    }
}
然后使用 curl http://ip.xxx:8000/ip 或者 curl http://ip.yyy:8000/ip 即可返回公网 IP.
3. 使用 Nginx Proxy Manager
因为网络环境的原因, 使用现成的 Nginx Proxy Manager 来代替 Nginx, 这里说一下我的网络环境:
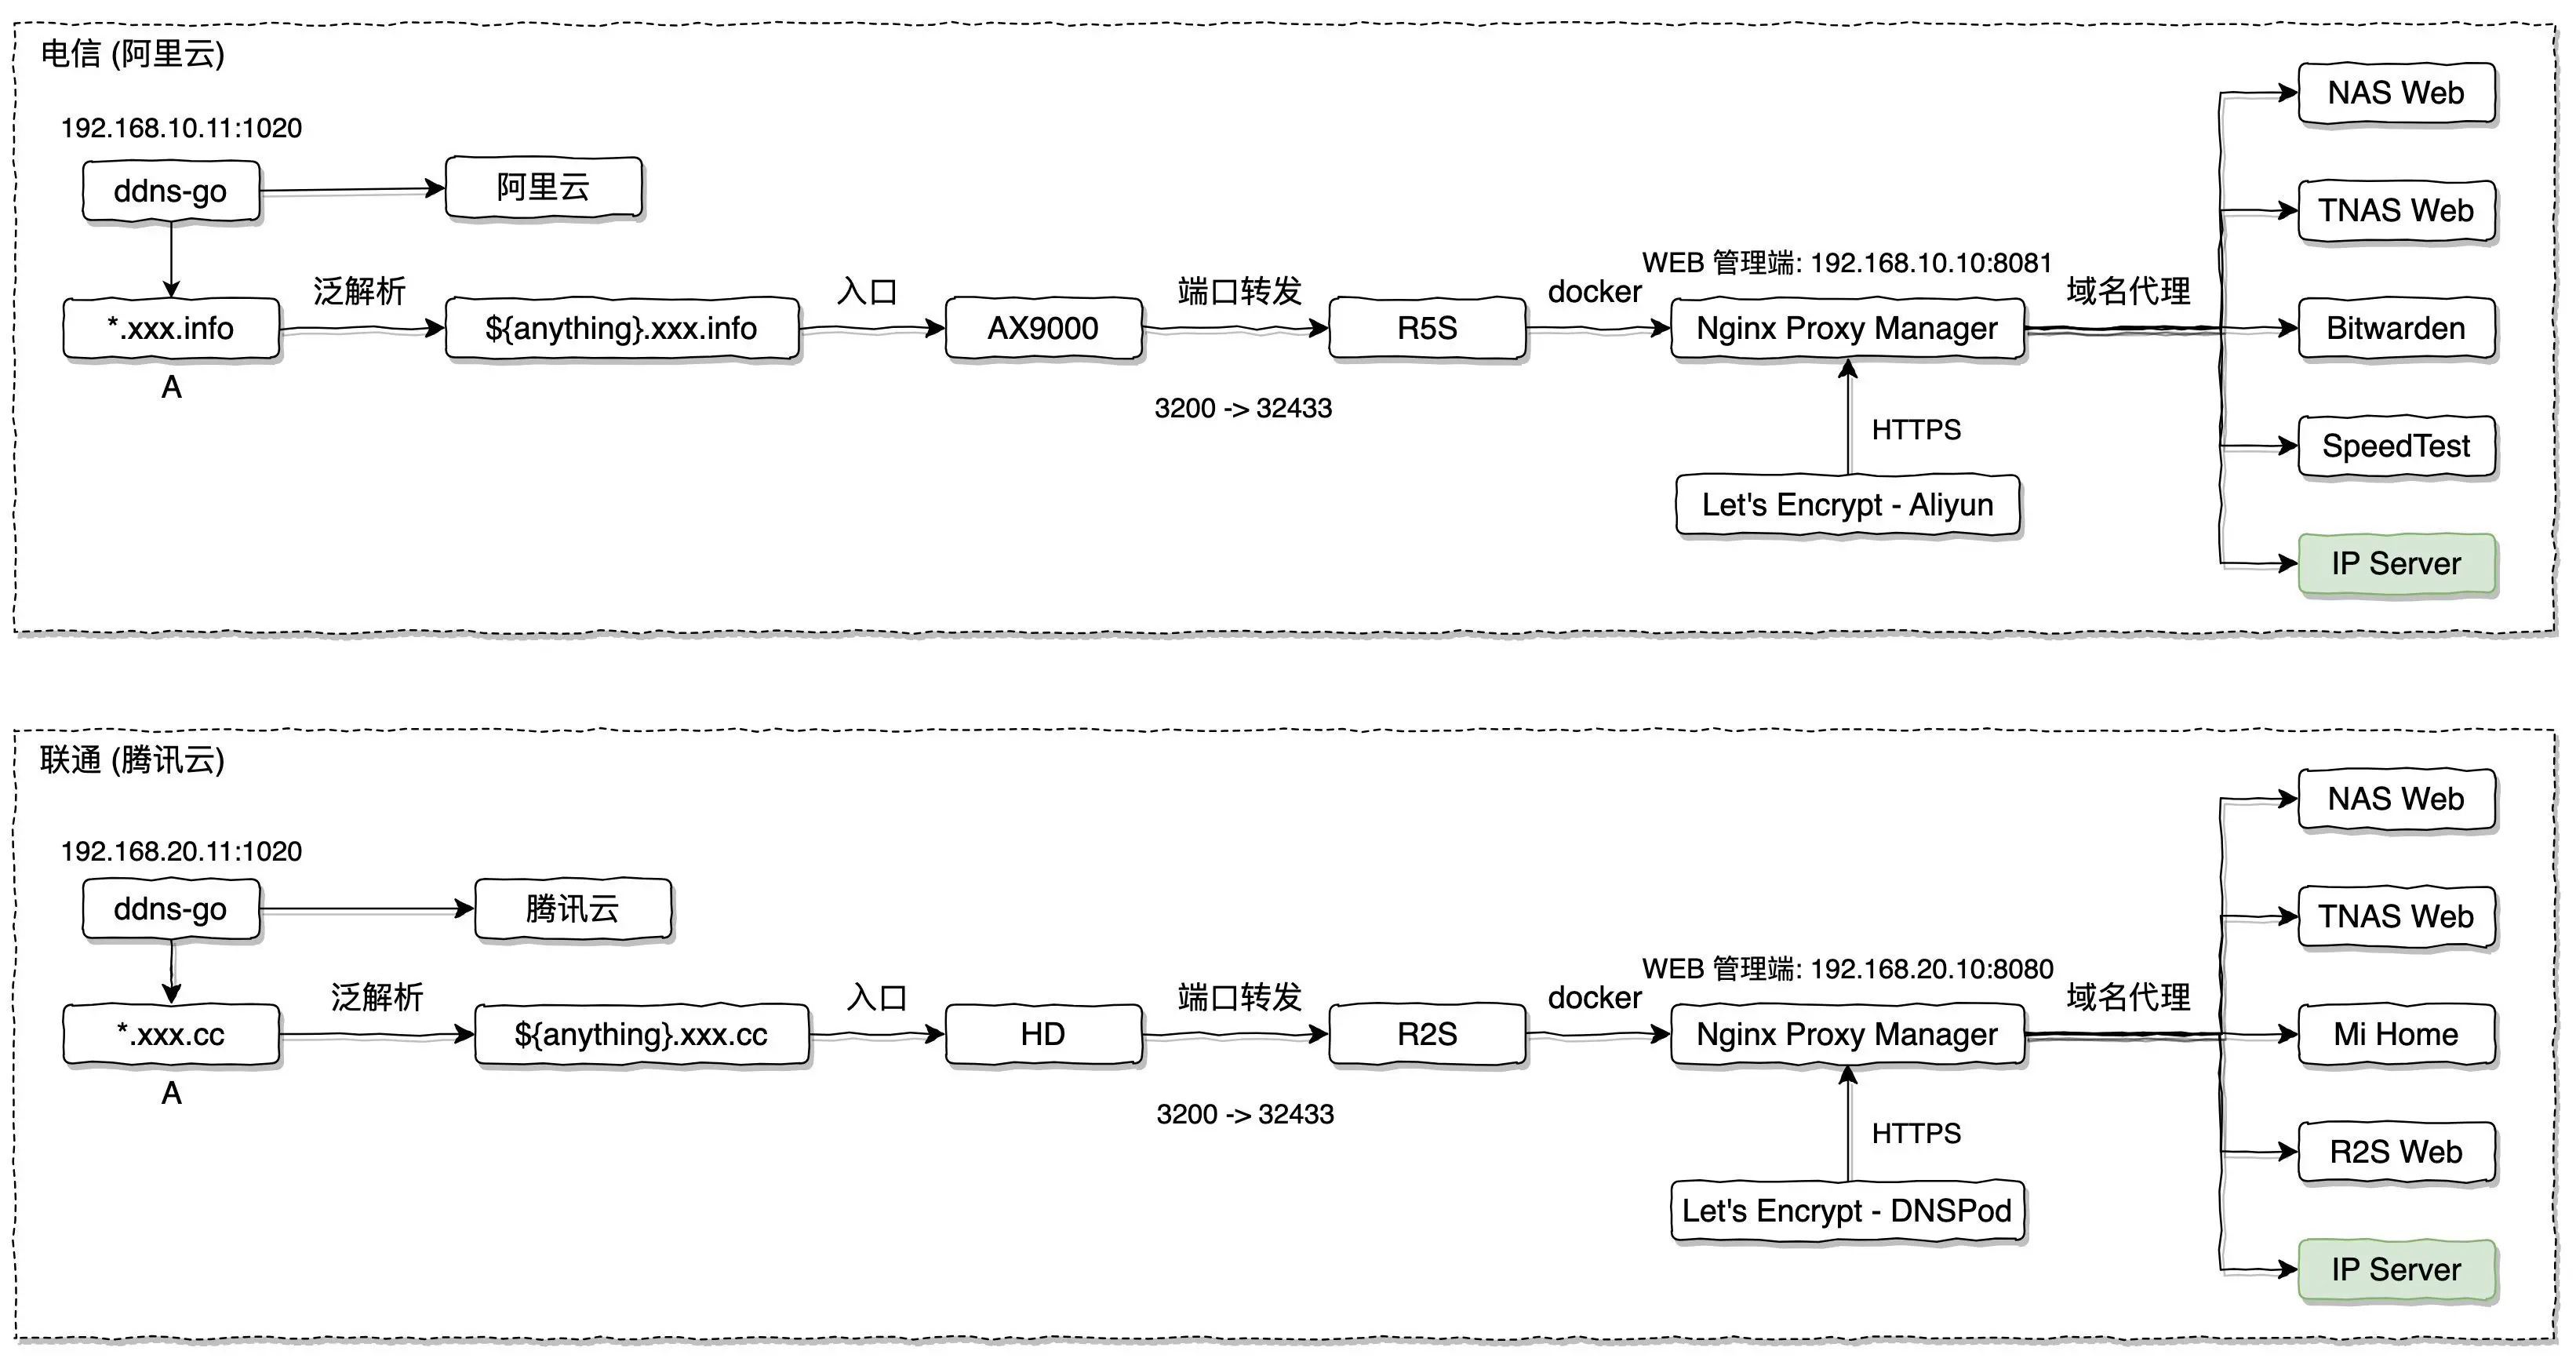
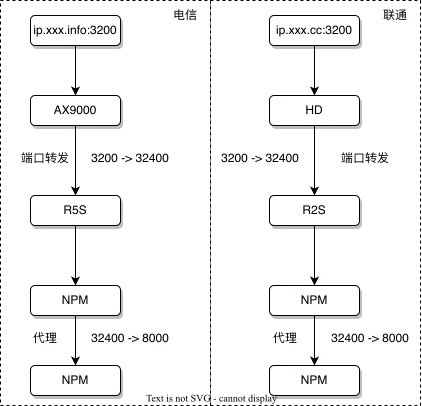
- 电信宽带使用 AX9000 作为路由器, 在路由器将 3200 端口转发到 192.168.10.10(NPM 服务) 的 32433 HTTPS 端口, 这样就可以使用
https://ip.xxx.info:3200来访问 NPM 的代理; - 联通宽带使用 HD 作为路由器, 同样将 3200 端口转发到 192.168.20.10(NPM 服务) 的 32433 HTTPS 端口, 这样就可以使用
https://ip.xxx.cc:3200来访问 NPM 的代理;
图上面的比如域名的范解析, 路由器的端口转发, NPM 的反向代理配置等配置就不再这里详细说明了, 如果需要的话可以参考网上关于 NPM 的使用方式.
3.1 域名泛解析
家里有 1000M 电信宽带和 1000M 联通宽带, 分别在阿里云和腾讯云购买了 2 个域名, 使用泛域名的好处是只需要配置一个泛域名即可支持无限多的二级域名, 这样家里新增了服务后就不需要再去云服务厂商配置域名了, 下面分别说一下域名泛解析的配置.
3.1.1 阿里云

_:泛解析,匹配其他所有域名, 比如配置了 _.aliyun.com, 将匹配: a.aliyun.com, b.aliyun,com
3.1.1 腾讯云

配置方式与阿里云一致. www 其实不需要配置.
3.2 路由器端口转发
家里都是小米路由器, 所以端口转发配置方式一致:
3.2.1 AX9000-电信

- 外部端口, 比如: 3200;
- 内部 IP 地址, 比如: 192.168.10.10;
- 内部端口: 比如: 32443, 这里的内部端口需要配置成 NPM 的 HTTPS 端口.
上述配置表示任何使用 3200 端口访问路由器的流量都会被转发到 192.168.10.10 服务器的 32443 端口.
3.2.2 HD-联通
将外部的 3400 端口转发到内部 192.168.20.10 服务器的 32443 端口;
3.3 NPM 代理
R5S 和 R2S 分别连接了电信和联通, NPM 使用 docker 部署, docker-compose.yml 如下:
version: '3.8'
services:
  app:
    image: 'chishin/nginx-proxy-manager-zh:latest'
    restart: unless-stopped
    ports:
    	# HTTP 端口
      - '8080:80'
      # web 管理端端口
      - '8081:81'
      # HTTPS 端口
      - '32443:443'
    volumes:
      - ./data:/data
      - ./letsencrypt:/etc/letsencrypt
3.3.1 R5S-电信
转发配置如下:

使用 https://ip.xxx.info:3200 进入的流量将被转发到 192.168.10.10:8000 所在的服务, 而 192.168.10.10 所在的服务器就是 NPM 所在的寄主机(R5S), 8000 端口需要后续的配置.
3.3.2 R2S-联通

使用 https://ip.xxx.cc:3200 进入的流量将被转发到 192.168.20.10:8000 所在的服务, 而 192.168.20.10 所在的服务器就是 NPM 所在的寄主机 (R2S), 8000 端口需要后续的配置.
以上配置完成后, 网络拓扑图如下:
3.4 配置 NPM 以支持获取公网 IP
R5S 和 R2S 的 NPM 配置一致, 这里就以 R5S 的配置为例来说明.
修改 ./data/nginx/proxy_host 下的配置文件 (具体的路径根据自己的 docker-compose.yml 来), 具体步骤为:
找到刚刚配置的代理配置文件, 比如我是 1.conf:
# ------------------------------------------------------------
# ip.xxx.info
# ------------------------------------------------------------

server {
  set $forward_scheme http;
  set $server         "192.168.10.10";
  set $port           8000;

  listen 80;
  listen [::]:80;
  listen 443 ssl http2;
	listen [::]:443 ssl http2;
  server_name ip.xxx.info;

 	# Let's Encrypt SSL
  include conf.d/include/letsencrypt-acme-challenge.conf;
  include conf.d/include/ssl-ciphers.conf;
  ssl_certificate /etc/letsencrypt/live/npm-21/fullchain.pem;
  ssl_certificate_key /etc/letsencrypt/live/npm-21/privkey.pem;

  access_log /data/logs/proxy-host-22_access.log proxy;
  error_log /data/logs/proxy-host-22_error.log warn;
  location / {
    # Proxy!
    include conf.d/include/proxy.conf;
  }
  # Custom
  include /data/nginx/custom/server_proxy[.]conf;
}
添加 IP 配置:
# ------------------------------------------------------------
# ip.xxx.info
# ------------------------------------------------------------

server {
  set $forward_scheme http;
  set $server         "192.168.10.10";
  set $port           8000;

  listen 80;
  listen [::]:80;
  listen 443 ssl http2;
	listen [::]:443 ssl http2;
  server_name ip.xxx.info;

  # Let's Encrypt SSL
  include conf.d/include/letsencrypt-acme-challenge.conf;
  include conf.d/include/ssl-ciphers.conf;
  ssl_certificate /etc/letsencrypt/live/npm-21/fullchain.pem;
  ssl_certificate_key /etc/letsencrypt/live/npm-21/privkey.pem;

  access_log /data/logs/proxy-host-22_access.log proxy;
  error_log /data/logs/proxy-host-22_error.log warn;
  location / {
    # Proxy!
    include conf.d/include/proxy.conf;
  }

  # 这是新增的
  location = /ip {
    add_header Content-Type text/plain;
    access_log off;
    return 200 "$remote_addr\n";
  }

  # Custom
  include /data/nginx/custom/server_proxy[.]conf;
}
3.4.1 重启 NPM
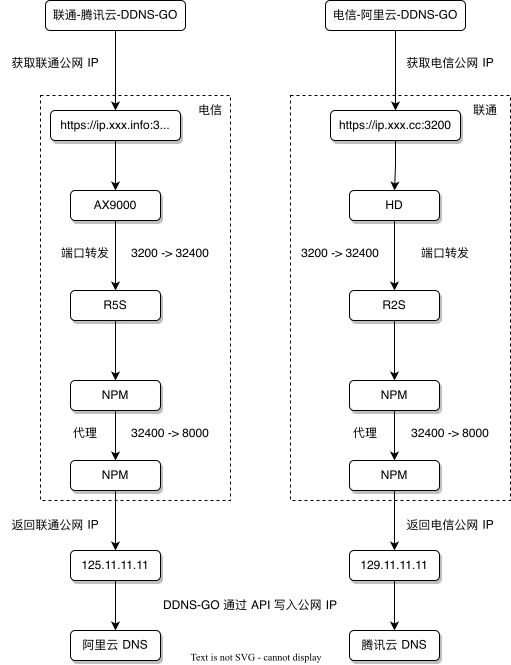
docker-compose restart重启 NPM 后即可使用 curl https://ip.xxx.info:3200/ip 获取公网 IP.
3.4.2 DDNS-GO 配置
3.4.2.1 电信

3.4.2.2 联通
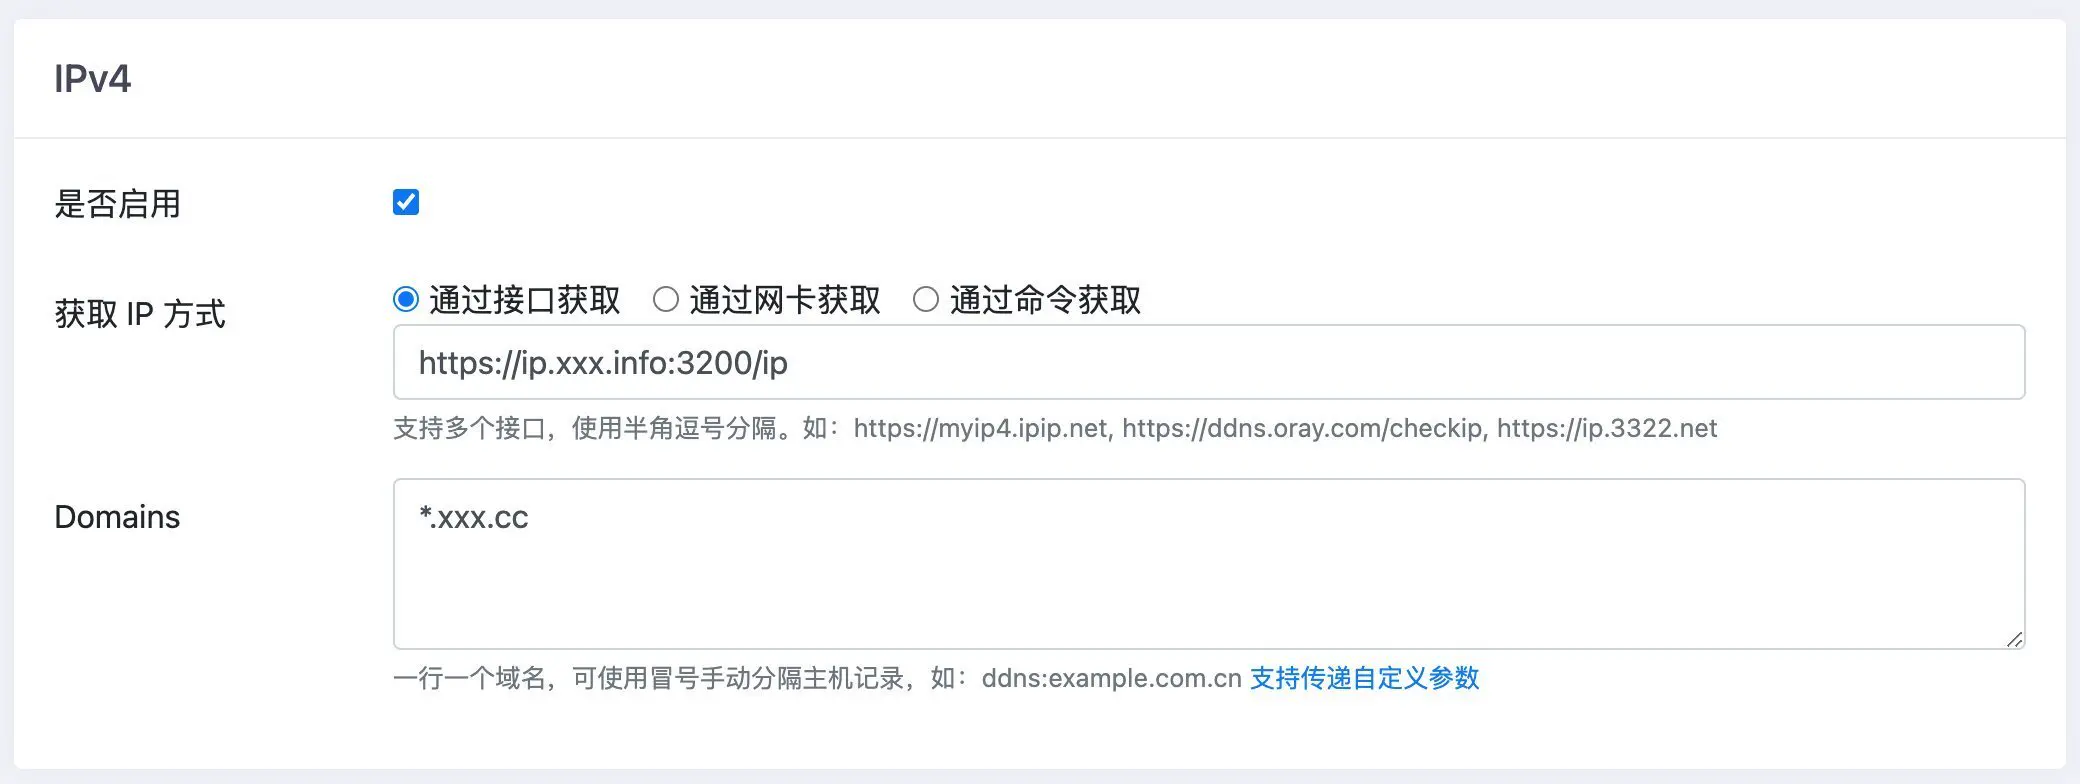
3.4.2.3 重启 DDNS-GO
docker-compose restart完成后的网络拓扑图如下:
4. 总结
DDNS-GO 一定要使用域名来获取公网 IP, 否则只能获取到局域网 IP;
以上核心的还是下面的配置:
location = /ip {
  add_header Content-Type text/plain;
  access_log off;
  return 200 "$remote_addr\n";
}
NPM 要区分 HTTP 和 HTTPS 端口, 如果路由器转发到 NPM 的 8080 则是 HTTP, 转发到 32443 则是 HTTPS;
HTTPS 端口需要配置 HTTPS , 可以使用 NPM 自带的 Let’s Encrypt 服务获取, 具体的配置方式可以参考官网;