
简介
前段时间在小黄鱼上捡了 2 张移远的 EC20, 今天折腾一下这张 4G 网卡.
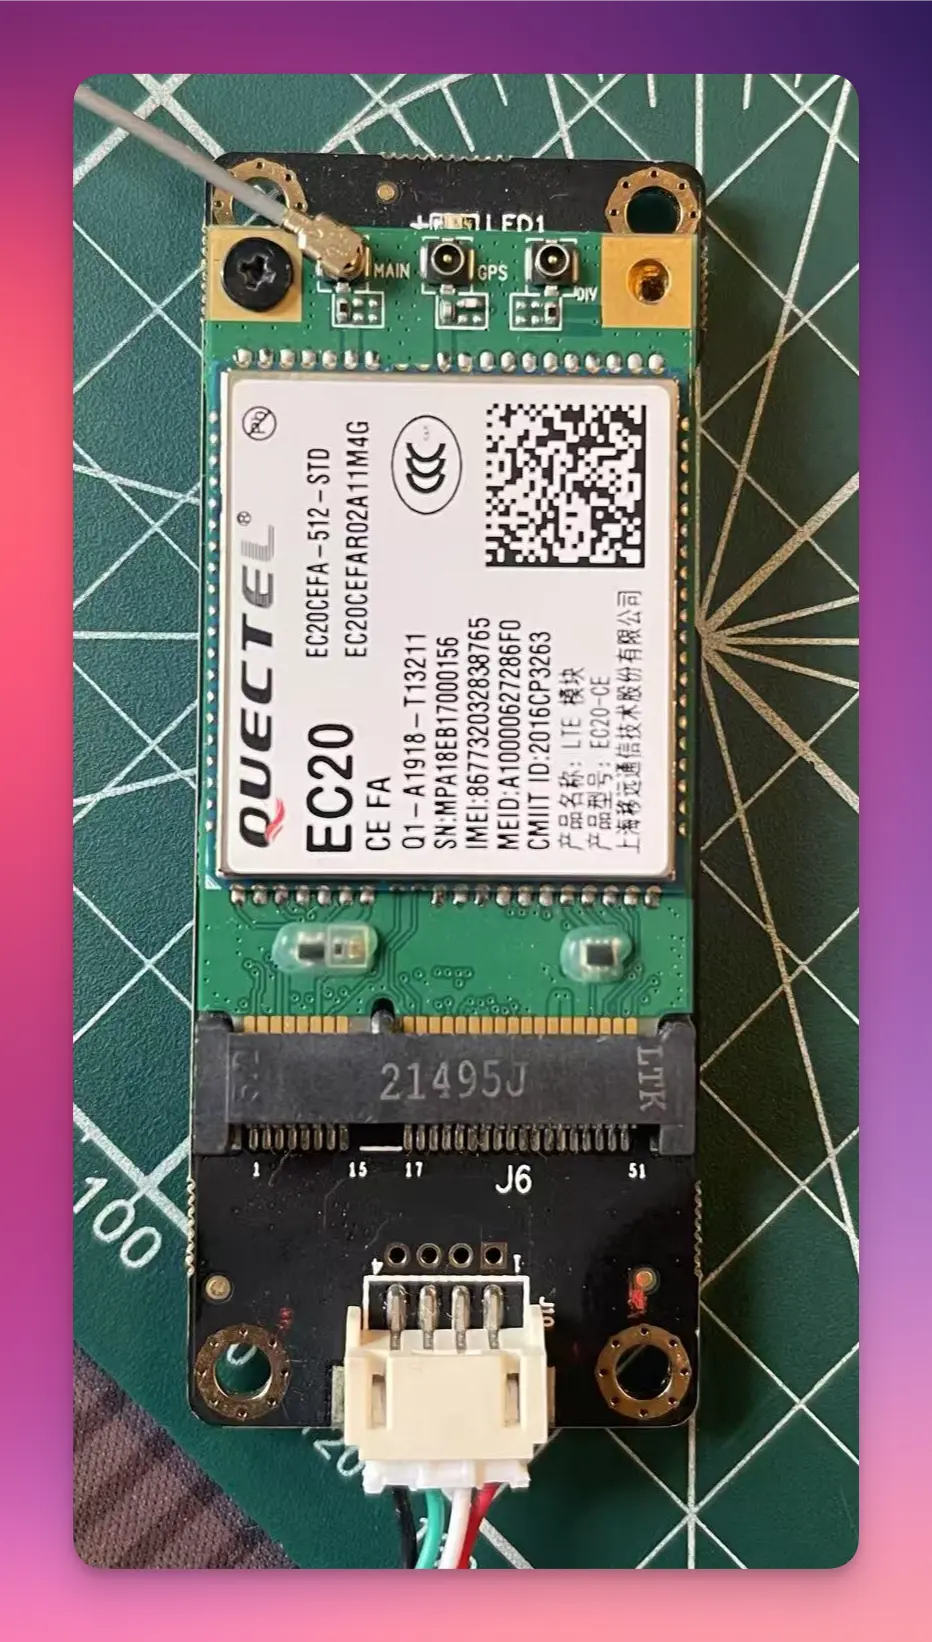
实战
- 移远 EC20 mini PCIE 模块
- usb 转 mini PCIE 模块
- ipex1 代转 sma 内孔转接线
- sma 内针 4G 天线
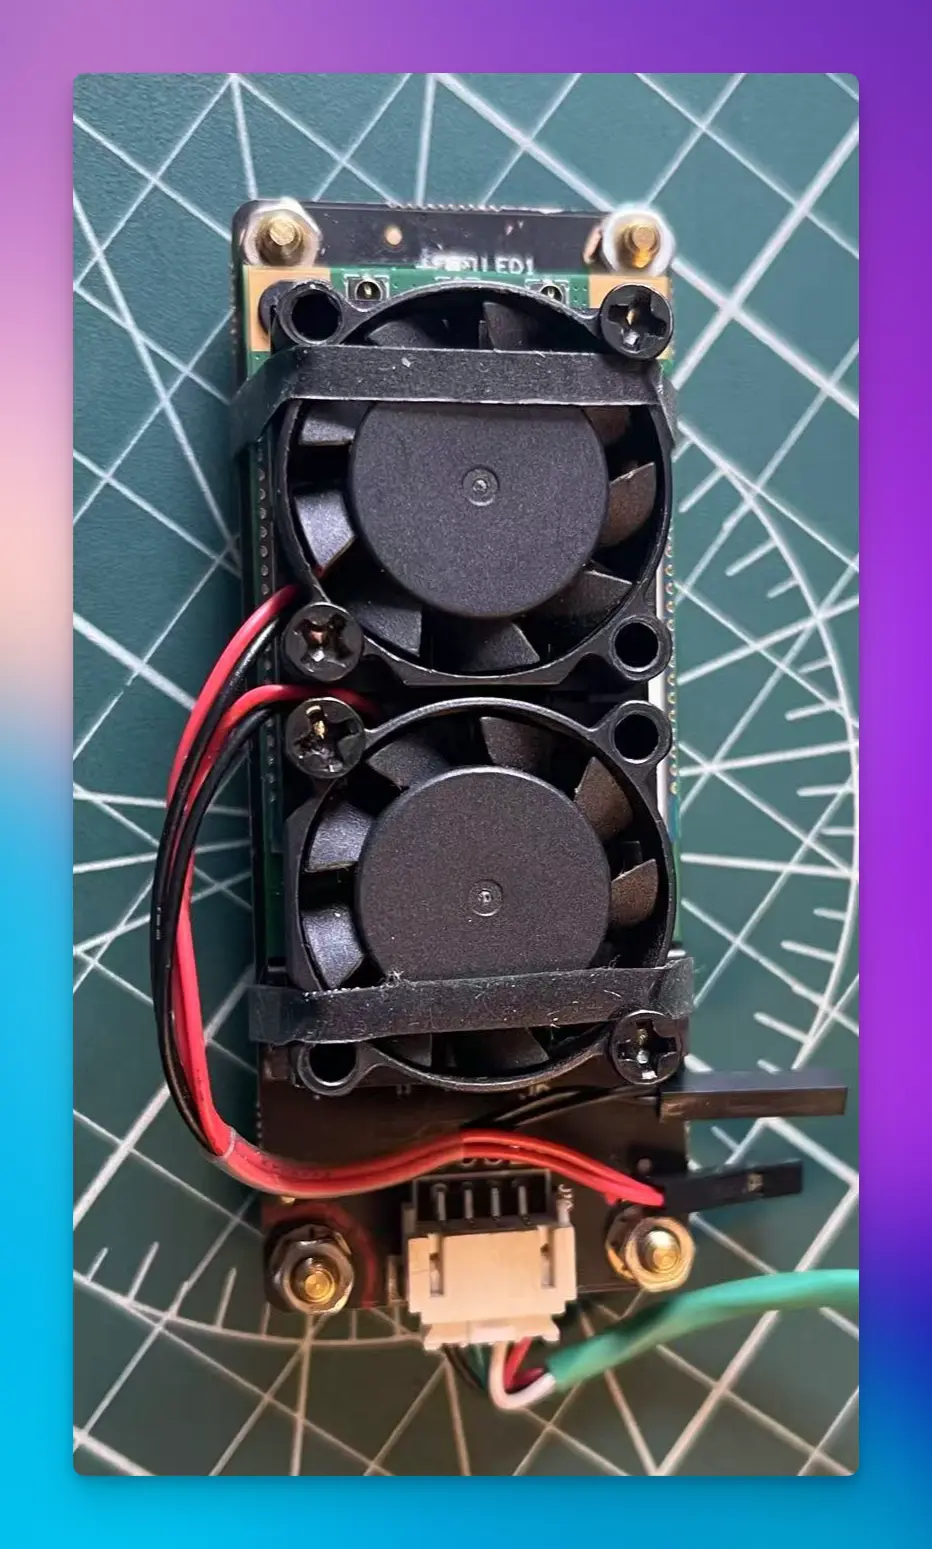
加上风扇:
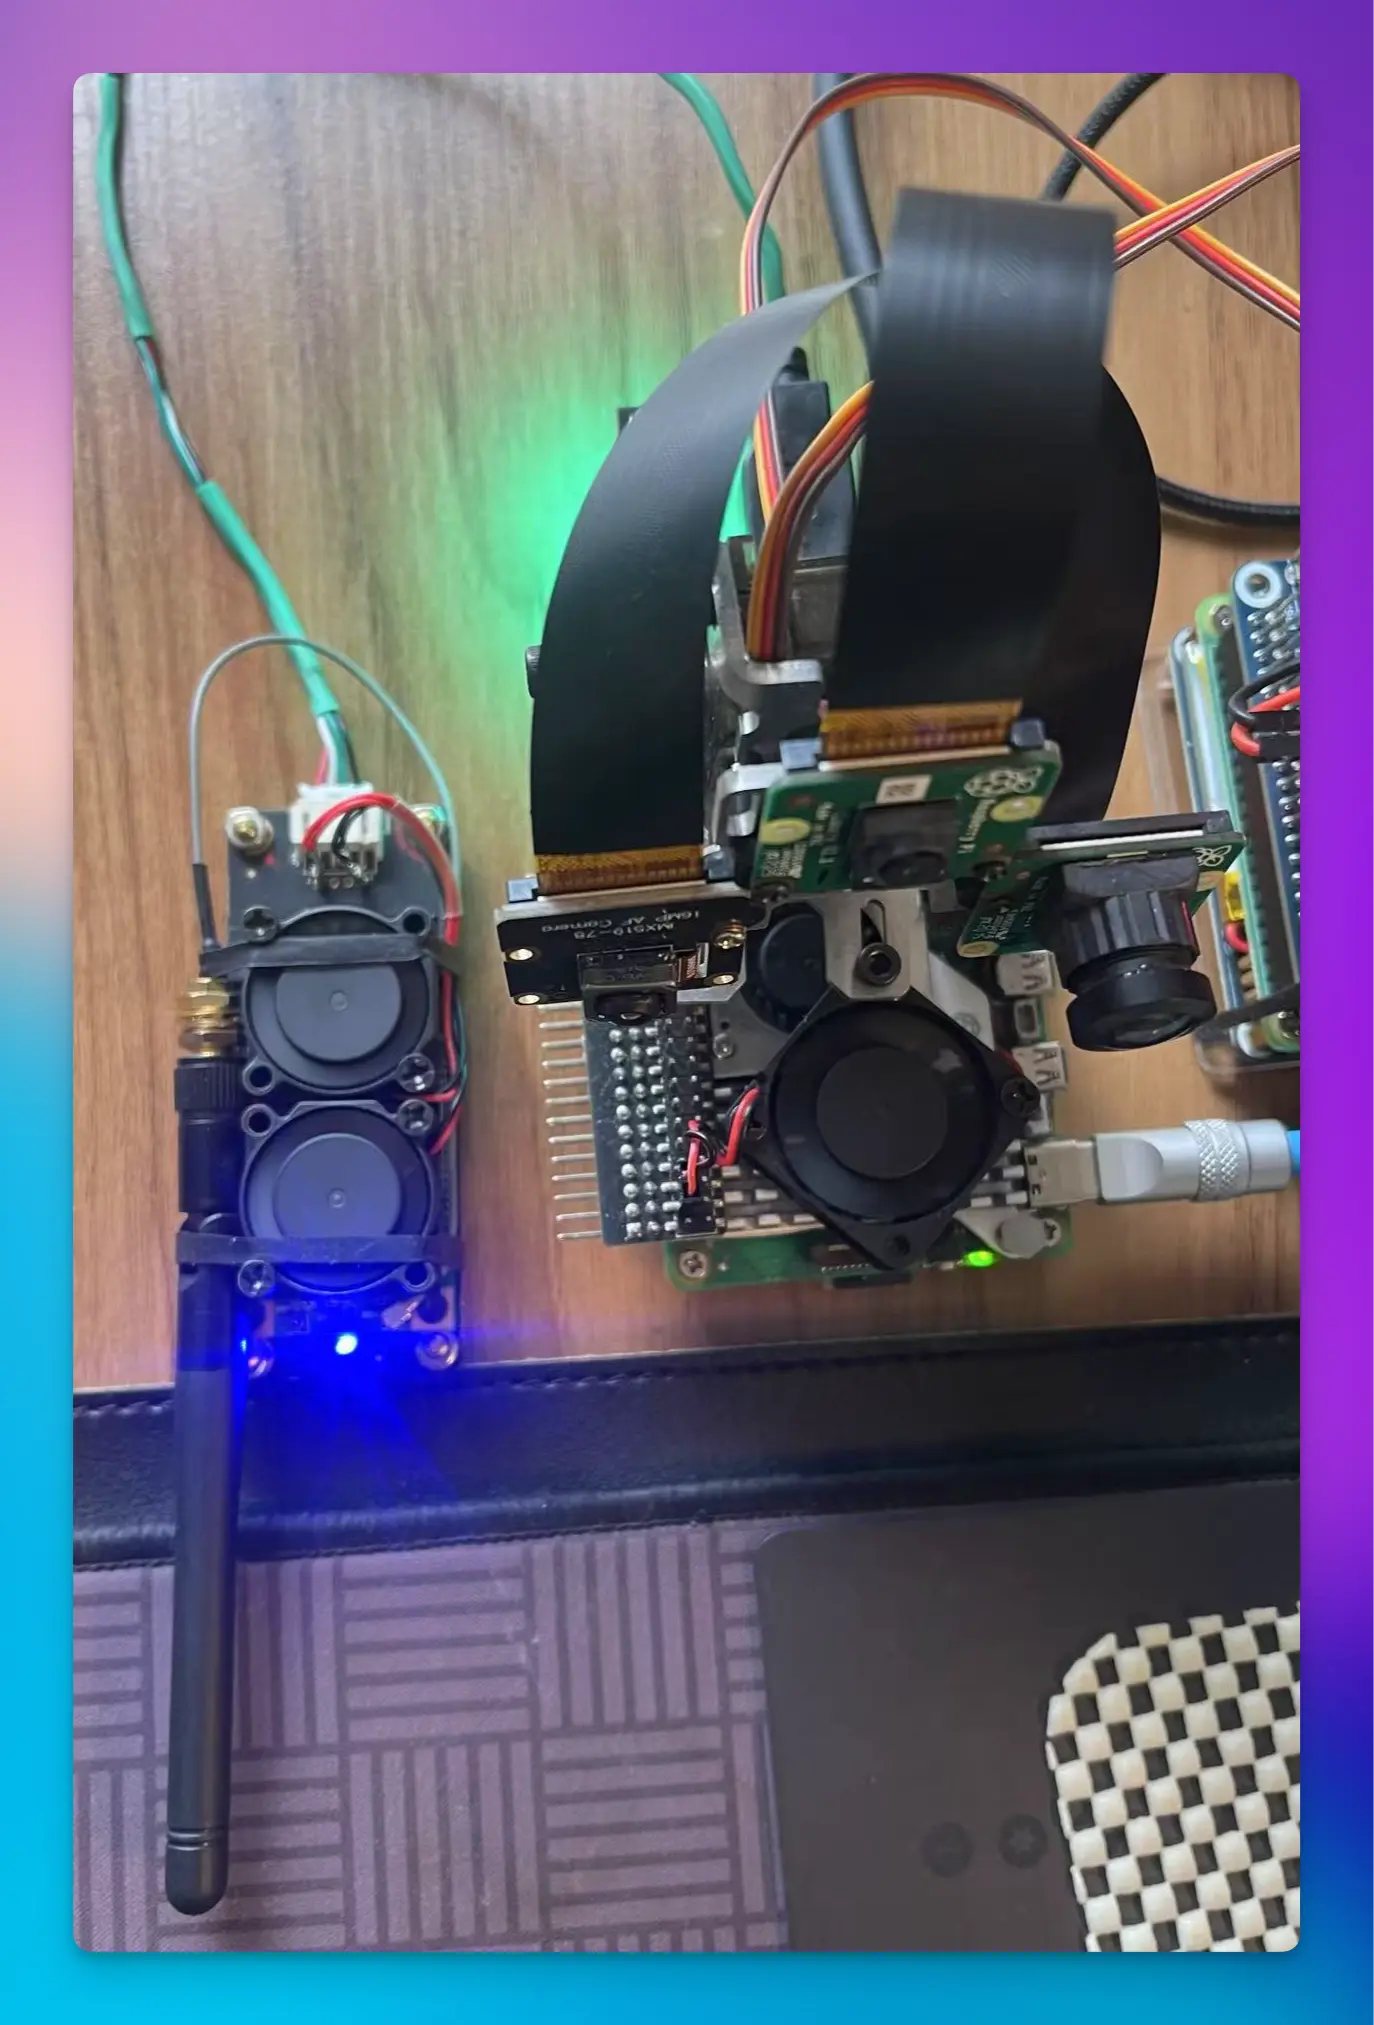
合体后的样子:
检查 USB 设备中是否存在 4G 模块
lsusb
Bus 001 Device 003: ID 2c7c:0125 Quectel Wireless Solutions Co., Ltd. EC25 LTE modem
Bus 001 Device 002: ID 2109:3431 VIA Labs, Inc. Hub
Bus 001 Device 001: ID 1d6b:0002 Linux Foundation 2.0 root hub
获取 4G 模块 USB 转串口终端
ls /dev/ttyUSB*

/dev/ttyUSB0 /dev/ttyUSB1 /dev/ttyUSB2 /dev/ttyUSB3
ppp0 拨号
第三节 树莓派 EC20 之 PPP 拨号上网_树莓派拨号上网-CSDN 博客
安装拨号工具
sudo apt install wvdial

# 打开配置文件
sudo vim /etc/wvdial.conf# 电信
[Dialer T]
Init1 = ATZ
Init2 = ATQ0 V1 E1 S0=0 &C1 &D2 +FCLASS=0
Modem Type = Analog Modem
Baud = 9600
New PPPD = yes
Modem = /dev/ttyUSB3
ISDN = 0
Phone = *99#
Password = card
Username = card
# 联通
[Dialer U]
Init1 = ATZ
Init2 = ATQ0 V1 E1 S0=0 &C1 &D2 +FCLASS=0
Init3 = at+cgdcont=1,"ip","uninet"
Modem Type = Analog Modem
Baud = 9600
New PPPD = yes
Modem = /dev/ttyUSB3
ISDN = 0
Phone = *99#
Password = card
Username = card拨号
➜  ~ sudo  wvdial  T
--> WvDial: Internet dialer version 1.61
--> Initializing modem.
--> Sending: ATZ
OK
--> Sending: ATQ0 V1 E1 S0=0 &C1 &D2 +FCLASS=0
ATQ0 V1 E1 S0=0 &C1 &D2 +FCLASS=0
OK
--> Modem initialized.
--> Sending: ATDT*99#
--> Waiting for carrier.
ATDT*99#
CONNECT 150000000
--> Carrier detected.  Waiting for prompt.
--> Don't know what to do!  Starting pppd and hoping for the best.
--> Starting pppd at Wed Feb 12 16:16:27 2025
--> Pid of pppd: 43894
--> Using interface ppp0
--> local  IP address 10.61.4.81
--> remote IP address 10.64.64.64
--> primary   DNS address 61.139.2.69
--> secondary DNS address 218.6.200.139
➜ ppp0 ip a | grep ppp0
23: ppp0: <POINTOPOINT,MULTICAST,NOARP,UP,LOWER_UP> mtu 1500 qdisc pfifo_fast state UNKNOWN group default qlen 3
inet 10.61.4.81 peer 10.64.64.64/32 scope global ppp0已经成功拨号
测试
➜  ~ ping -I ppp0 8.8.8.8
PING 8.8.8.8 (8.8.8.8) from 10.61.4.81 ppp0: 56(84) bytes of data.
64 bytes from 8.8.8.8: icmp_seq=1 ttl=54 time=133 ms
64 bytes from 8.8.8.8: icmp_seq=2 ttl=54 time=44.1 ms
64 bytes from 8.8.8.8: icmp_seq=3 ttl=54 time=46.1 ms
64 bytes from 8.8.8.8: icmp_seq=4 ttl=54 time=52.8 ms
从公网访问 HomeLab:
➜  ~ iperf3 -c zzz.xxx.yyy
Connecting to host zzz.xxx.yyy, port 12421
[  5] local 10.61.4.81 port 41632 connected to 123.123.123.123 port 12421
[ ID] Interval           Transfer     Bitrate         Retr  Cwnd
[  5]   0.00-1.00   sec   852 KBytes  6.98 Mbits/sec    0   64.5 KBytes
[  5]   1.00-2.00   sec  1.24 MBytes  10.4 Mbits/sec    0    126 KBytes
[  5]   2.00-3.00   sec  2.22 MBytes  18.6 Mbits/sec    0    226 KBytes
[  5]   3.00-4.00   sec  2.53 MBytes  21.2 Mbits/sec    8    147 KBytes
[  5]   4.00-5.00   sec  1.85 MBytes  15.5 Mbits/sec    0    167 KBytes
[  5]   5.00-6.00   sec  2.22 MBytes  18.6 Mbits/sec    0    176 KBytes
[  5]   6.00-7.00   sec  1.91 MBytes  16.0 Mbits/sec   10    138 KBytes
[  5]   7.00-8.00   sec  1.85 MBytes  15.5 Mbits/sec    0    146 KBytes
[  5]   8.00-9.00   sec  1.85 MBytes  15.5 Mbits/sec    0    149 KBytes
[  5]   9.00-10.00  sec  1.85 MBytes  15.5 Mbits/sec    1    155 KBytes
- - - - - - - - - - - - - - - - - - - - - - - - -
[ ID] Interval           Transfer     Bitrate         Retr
[  5]   0.00-10.00  sec  18.4 MBytes  15.4 Mbits/sec   19             sender
[  5]   0.00-10.08  sec  17.5 MBytes  14.6 Mbits/sec                  receiver
更换默认路由
# 查看路由
sudo route -n

Kernel IP routing table
Destination     Gateway         Genmask         Flags Metric Ref    Use Iface
0.0.0.0         192.168.31.1    0.0.0.0         UG    100    0        0 eth0
0.0.0.0         192.168.21.1    0.0.0.0         UG    600    0        0 wlan0
10.64.64.64     0.0.0.0         255.255.255.255 UH    0      0        0 ppp0

# 添加 ppp0 网卡设备为默认路由
sudo route add default dev ppp0
# 删除操作
sudo route del default dev ppp0
最后,其实 ppp0 拨号,是 4g 时代以前所使用的拨号方式,也限制 ec20 的入网速度,对于现在 4g/5g 时代,ppp0 拨号已经无法发挥模块的性能,官方也不再建议使用 ppp0 拨号,目前最常用的 GobiNet,而且树莓派内核已经支持了 qmi_wwan 的驱动.
qmi_wwan 拨号
第四节 树莓派 EC20 之 QMI_WWAN 拨号_quectel-cm-CSDN 博客
自动拨号
第五节 树莓派 EC20 自动拨号脚本编写_ec20 拨号脚本-CSDN 博客
#! /bin/bash

#运行步骤变量初始化
ec20_step=0

#超时计数初始化
over_time=0

#循环
while [ 1 ]
do
	#第一步先检查驱动
	if [ $ec20_step -eq 0 ]; then
	#使用lsusb查看是否有ec20驱动 grep查询结果是否包含Quectel
		result=$(lsusb | grep Quectel)
		echo "1. 检查驱动: " $result
		if [[ $result =~ "EC25" ]]; then
			ec20_step=1

		else
			ec20_step=0
		fi
		#延时2s
		sleep 2
	#第二步 开始使用 wvdial 拨号
	elif [ $ec20_step -eq 1 ]; then
		echo "2. wvdial 拨号"
		echo "password" | sudo nohup wvdial T &
		ec20_step=2

		sleep 2
	#第三步 查询路由是否包含 ppp0 网卡,拨号成功则会包含有 ppp0 网卡
	elif [ $ec20_step -eq 2 ]; then
		result=$(route -n | grep ppp0)

		echo "3. 检查是否存在 ppp0 网卡" $result

		if [[ $result =~ "ppp0" ]]; then
			echo "3.1 包含网卡,添加默认路由"
			#若包含网卡,则添加默认路由
			echo "password" | sudo route add default dev ppp0
			ec20_step=3
			over_time=0
		else
			echo "3.2 不包含网卡, 再次循环查询, 循环次数:" $over_time
			#超时计数
			let over_time++
		fi
		#若一分钟都没有路由网卡则说明没有拨号成功
		if [ $over_time -eq 12 ]; then
			echo "12 次检查不存在路由网卡, 说明没有拨号成功, 进入重启逻辑"
			over_time=0
			#超时拨号则跳入重启步骤
			ec20_step=4
		fi

		sleep 5
	#第四步 通过 ping 命令检查网络状态
	elif [ $ec20_step -eq 3 ]; then
		result=$(ping -I ppp0 -c 1 www.baidu.com)

		echo "4. 通过 ping 命令检查网络状态" $result

		if [[ $result =~ "1 received" ]]; then
			echo "4.1 ping 成功"
			over_time=0
		else
			echo "4.2 ping 失败, 再次循环查询"
			let over_time++

		fi
		#超时则杀掉拨号线程,并进入重启步骤
		if [ $over_time -eq 6 ]; then
			echo "6 次 ping 失败, 进入重启逻辑"
			over_time=0
			ec20_step=4
			echo "password" | sudo pkill wvdial
		fi
		sleep 5

	#第五步重启模块
	elif [ $ec20_step -eq 4 ]; then
		echo "重启网卡"
		echo -e "AT+CFUN=1,1\r\n" > /dev/ttyUSB2
		ec20_step=0
		#重启命令后延时稍微长一点
		sleep 15
	fi

done
exit 0
开机自启动
sudo vim /etc/rc.local
//在文件exit 0前加入此句,:wq保存,重启即可生效
# ppp0 拨号
bash /root/ppp0.start >> /root/ppp0.log 2>&1
另一种方式:
[Unit]
Description=ppp0 service
After=network.target

[Service]
Restart=on-failure
RestartSec=5
ExecStart=/bin/bash /root/ppp0.start
StandardOutput=/root/ppp0.log
StandardError=/root/ppp0.log

[Install]
WantedBy=multi-user.target
查看日志
journalctl -u ppp0.service -f查看服务信息
systemctl show ppp0发送短信
让你的树莓派和手机备号不再吃灰:短信转发_电脑整机_什么值得买 看这个
得先拨号并设置 ppp0 为默路由
sudo apt-get install gammu
sudo gammu-config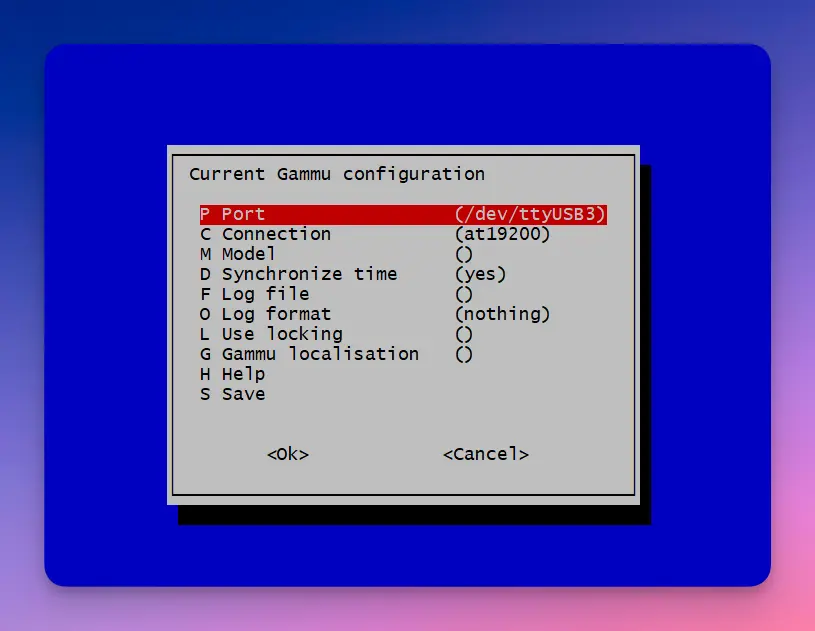
# 查看设备信息
sudo gammu --identify
sudo gammu sendsms TEXT 手机号 -text "这是一条短信,from raspi" -unicode
echo "a test sms from ec20" | sudo gammu sendsms TEXT 18628362906配置文件保存在 /root/.gammurc
# This is a generated gammurc file.
# It was generated by Gammu configurator 0.4

# In Unix/Linux  : copy it into your home directory and name it .gammurc
#                  or into /etc and name it gammurc
# In Win32       : copy it into directory with Gammu.exe and name gammurc

# Port           : in Windows/DOS: "com*:",
#                  (instead of "*" please put "1", "2", etc.)
#                  in other (Linux/Unix) "/dev/ttyS%"
#                                     or "/dev/ircomm%" ("irda" connection)
#                  (instead of "%" please put "0", "1", "2", etc.)
# Model          : use only, when Gammu doesn't recognize your phone model.
#                  Put it here. Example values: "6110", "6150", "6210", "8210"
# Connection     : type of connection. Use "fbus" or "mbus" or "dlr3" or
#                  "irda" (Infrared over sockets) or "infrared" (DirectIR)
#                  or "at19200" (AT commands on 19200, 8 bits, None parity,
#                  1 stop bit, no flow control) or "at115200" (AT commands on
#                  115200, 8 bits, None parity, 1 stop bit, no flow control)
#                  or "atblue" (AT over BlueTooth) or "dlr3blue" (FBUS
#                  over BlueTooth)
# SynchronizeTime: if you want to set time from computer to phone during
#                  starting connection. Do not rather use this option when want
#                  to reset phone during connection (in some phones need to
#                  set time again after restart)
# Logfile        : Use, when want to have logfile from communication.
# Logformat      : What debug info and format should be used:
#                  "nothing" - no debug level, "text" - transmission dump in
#                  text format, "textall" - all possible info in text format,
#                  "errors"  - errors in text format, "binary" - transmission
#                  dump in binary format
# Use_Locking    : under Unix/Linux use "yes", if want to lock used device
#                  to prevent using it by other applications
# GammuLoc       : name of localisation file

[gammu]

port = /dev/ttyUSB3
model =
connection = at19200
synchronizetime = yes
logfile =
logformat = nothing
use_locking =
gammuloc =
拨打电话
GPS
19. 使用 4G 模块 — [野火]快速使用手册——基于 STM32MP157 开发板 文档
blog.51cto.com/u_16213606/8883744
树莓派+4G 模块获取 gps 坐标 - guwei4037 - 博客园
EC20 模块在树莓派下查看 GPS 数据的演示_ec20 是全系列支持 gps 么-CSDN 博客
sudo apt-get install minicom
sudo minicom -D /dev/ttyUSB2

# 开启 GPS
AT+QGPS=1

# 新开 console
# 查看 GPS 数据
sudo minicom -D /dev/ttyUSB1
三、通过 gpsd 查看 gps 数 据
minicom 查看 gps 数据不太好看(数据没有格式化显示),有 gpsd 工具帮助我们更好的观察数据变化。
1.安装 gpsd
sudo apt-get install gpsd gpsd-clients python3-gps2.配置 gpsd
sudo gpsd /dev/ttyUSB1 -N -D 9 -F /var/run/gpsd.sock -S 3333其中 3333 是端口号,可以自行定义
3.监听 gpsd 新开一个终端,执行 cgps -s localhost:3333 启动之后,如果出现短时间收不到数据的情况,请耐心等待几分钟。一般过个 1 分钟左后会收到 gps 数据的。 最后,读者可以自己写程序监控 ttyUSB1 串口输出,解析数据就可以得到 gps 信息了。然后上传 gps 坐标,可以通过 socket 或其它形式与服务器通信(前提已配置 4G 卡无线上网),把坐标信息保存到服务器数据库。
AT
blog.51cto.com/u_13640625/3029461
sudo apt-get install minicom
sudo minicom -s
sudo minicom -b 9600 -o -D /dev/ttyUSB0

busybox microcom -s 115200 /dev/ttyUSB2
全集
使用 EC20 模块配合 asterisk 及 freepbx 实现短信转发和网络电话 | Sparktour’s Blog
ttyUSB0
ttyUSB1 PCM语音,GPS信号
ttyUSB2 控制命令
ttyUSB3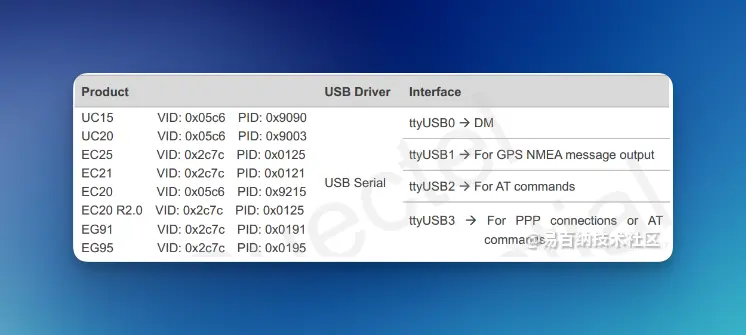
EC20 挂载系统成功后,在 Windows 环境下会有三个 com 口,分别为 AT Port、DM Port、NMEA Port。其中 AT Port 用于 AT 指令的收发,而 NMEA Port 用于 GPS NMEA 数据的接收。 在 Linux 系统下,EC20 被成功识别并加载后,会有四个/dev/ttyUSBx 设备文件, ttyUSB2 用于 AT 指令收发,ttyUSB1 用于 GPS NMEA 的接收。
/dev/ttyUSB0:DM 功能(Diagnostic and Monitoring,诊断和监控)
/dev/ttyUSB1:GPS NMEA 数据接收
/dev/ttyUSB2:AT 指令收发
/dev/ttyUSB3:PPP 连接或者 AT 指令收发
参考资料
SIM7600CE
EC20
- 树莓派 4B 4G 随身 wifi - Zok 的博客
- 树莓派+4G 模块接收短信实时转发到邮箱_树莓派外接 sim 卡模块-CSDN 博客
- 4G 模块 :EC20 模块———AT 指令收发短信-CSDN 博客
- 树莓派使用 EC20 上网_ec20 模块通过物理串口联网-CSDN 博客
- 树莓派专用外壳版 EC20 4GLTE 模块 语音短信 GPS Ubuntu SAM9X25—基础版 - 树莓派 4G 模块 Mcuzone 商城
- 树莓派 EC20 模块联网 | yan blog
- 第三节 树莓派 EC20 之 PPP 拨号上网_树莓派拨号上网-CSDN 博客
- 第四节 树莓派 EC20 之 QMI_WWAN 拨号_quectel-cm-CSDN 博客
- 第五节 树莓派 EC20 自动拨号脚本编写_ec20 拨号脚本-CSDN 博客