
简介
一直在使用 TianliGPT 作为博客的摘要生成服务, 便宜好用. 年前爆火的 DeepSeek-R1 算是把 LLM API 的价格打下来了, 便有了替换 AI 文章摘要的想法.
其实在 使用 Node.js 开发数字名片并集成 Chat 服务 这篇文章已经将本地的 LLM API 服务搭建好了, 因为 TianliGPT 的语音播报服务无法使用, 所以一直在等 Kokoro TTS 的中文模型, 正好今天开源了, 所以又可以开始折腾了.
需求整理
- 使用自建 AI API 代替 TianliGPT API 来生成文章摘要;
- 使用 Kokoro TTS 将文章摘要生成语音并播放;
需求其实挺简单, 就是替换成部署到 HomeLab 的 API, So easy 🙉.
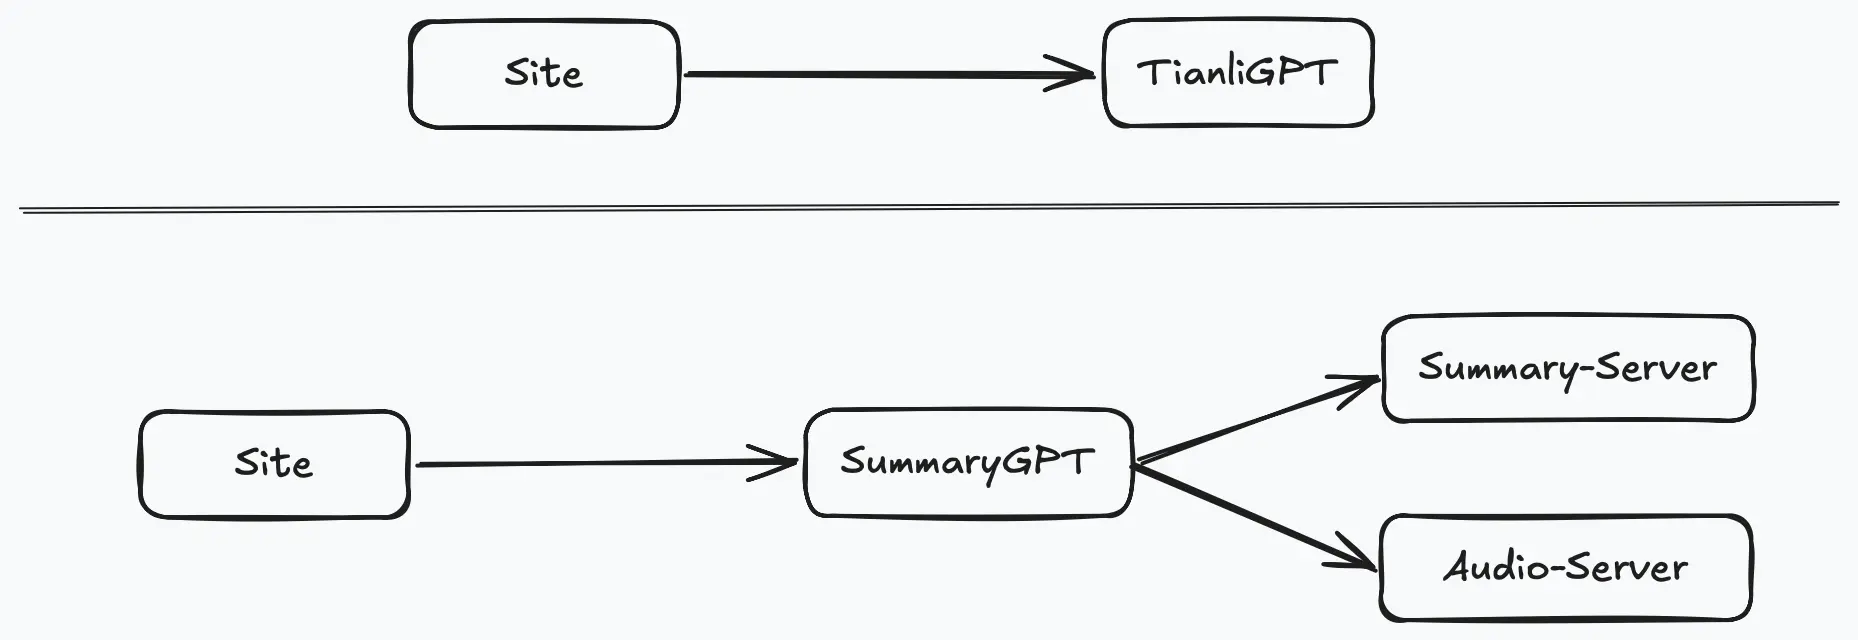
架构图
一、环境准备
1. 技术栈概述
- 博客框架:Hexo
- AI 服务:本地部署的 LLM 以及在线免费的 LLM 服务 API, 通过 one-api 代理(替代 TianliGPT)
- 语音合成:Kokoro TTS
2. 硬件与软件要求
- 服务器环境:
- Mac mini M2(16G 内存), 用于部署 Kokoro TTS;
- M920x: 用于部署摘要服务和语音生成客户端服务;
- 开发工具:
- Node.js: 摘要服务;
- Python: 语音生成客户端服务;
- pm2: 服务器部署使用;
二、实现细节
1. Hexo 代码修改
通过直接修改 TianliGPT 代码实现, 安知鱼主题中的 themes/anzhiyu/source/js/anzhiyu/ai_abstract.js 是文章摘要服务的主要逻辑, 我们需要将这个文件拷贝出来进行相应的修改:
(function () {
  const {
    randomNum,
    basicWordCount,
    btnLink,
    apiUrl,
    audioUrl,
    key: AIKey,
    Referer: AIReferer,
    gptName,
    switchBtn,
    mode: initialMode,
  } = GLOBAL_CONFIG.postHeadAiDescription;

  const { title, postAI, pageFillDescription } = GLOBAL_CONFIG_SITE;

  let lastAiRandomIndex = -1;
  let animationRunning = true;
  let mode = initialMode;
  let refreshNum = 0;
  let prevParam;
  let audio = null;
  let isPaused = false;
  let summaryID = null;

  const post_ai = document.querySelector(".post-ai-description");
  const aiTitleRefreshIcon = post_ai.querySelector(
    ".ai-title .anzhiyufont.anzhiyu-icon-arrow-rotate-right"
  );
  let aiReadAloudIcon = post_ai.querySelector(".anzhiyu-icon-circle-dot");
  const explanation = post_ai.querySelector(".ai-explanation");

  let aiStr = "";
  let aiStrLength = "";
  let delayInit = 600;
  let indexI = 0;
  let indexJ = 0;
  let timeouts = [];
  let elapsed = 0;

  const observer = createIntersectionObserver();
  const aiFunctions = [
    introduce,
    aiTitleRefreshIconClick,
    aiRecommend,
    aiGoHome,
    subscribe,
  ];

  const aiBtnList = post_ai.querySelectorAll(".ai-btn-item");
  const filteredHeadings = Array.from(aiBtnList)
    .filter((heading) => heading.id !== "go-tianli-blog")
    .filter((heading) => heading.id !== "read-audio")
    .filter((heading) => heading.id !== "go-comment");
  filteredHeadings.forEach((item, index) => {
    item.addEventListener("click", () => {
      aiFunctions[index]();
    });
  });

  document.getElementById("ai-tag").addEventListener("click", onAiTagClick);
  aiTitleRefreshIcon.addEventListener("click", onAiTitleRefreshIconClick);
  document.getElementById("go-tianli-blog").addEventListener("click", () => {
    window.open(btnLink, "_blank");
  });
  document.getElementById("go-comment").addEventListener("click", () => {
    anzhiyu.scrollToDest(document.body.scrollHeight, 500);
  });
  document.getElementById("read-audio").addEventListener("click", readAloud);
  aiReadAloudIcon.addEventListener("click", readAloud);

  async function readAloud() {
    if (!summaryID) {
      anzhiyu.snackbarShow("摘要还没加载完呢,请稍后。。。");
      return;
    }
    aiReadAloudIcon = post_ai.querySelector(".anzhiyu-icon-circle-dot");
    aiReadAloudIcon.style.opacity = "0.2";
    if (audio && !isPaused) {
      audio.pause();
      isPaused = true;
      aiReadAloudIcon.style.opacity = "1";
      aiReadAloudIcon.style.animation = "";
      aiReadAloudIcon.style.cssText =
        "animation: ''; opacity: 1;cursor: pointer;";
      return;
    }

    if (audio && isPaused) {
      audio.play();
      isPaused = false;
      aiReadAloudIcon.style.cssText =
        "animation: breathe .5s linear infinite; opacity: 0.2;cursor: pointer";
      return;
    }

    const options = {
      key: AIKey,
      Referer: AIReferer,
    };
    const requestParams = new URLSearchParams({
      key: options.key,
      id: summaryID,
    });

    const requestOptions = {
      method: "GET",
      headers: {
        "Content-Type": "application/json",
        Referer: options.Referer,
      },
    };

    try {
      const response = await fetch(
        `${audioUrl}?${requestParams}`,
        requestOptions
      );
      if (response.status === 403) {
        console.error("403 refer与key不匹配。");
      } else if (response.status === 500) {
        console.error("500 系统内部错误");
      } else {
        const audioBlob = await response.blob();
        const audioURL = URL.createObjectURL(audioBlob);
        audio = new Audio(audioURL);
        audio.play();
        aiReadAloudIcon.style.cssText =
          "animation: breathe .5s linear infinite; opacity: 0.2;cursor: pointer";
        audio.addEventListener("ended", () => {
          audio = null;
          aiReadAloudIcon.style.opacity = "1";
          aiReadAloudIcon.style.animation = "";
        });
      }
    } catch (error) {
      console.error("请求发生错误❎");
    }
  }
  if (switchBtn) {
    document
      .getElementById("ai-Toggle")
      .addEventListener("click", changeShowMode);
  }

  aiAbstract();
  showAiBtn();

  function createIntersectionObserver() {
    return new IntersectionObserver(
      (entries) => {
        let isVisible = entries[0].isIntersecting;
        animationRunning = isVisible;
        if (animationRunning) {
          delayInit = indexI === 0 ? 200 : 20;
          timeouts[1] = setTimeout(() => {
            if (indexJ) {
              indexI = 0;
              indexJ = 0;
            }
            if (indexI === 0) {
              explanation.innerHTML = aiStr.charAt(0);
            }
            requestAnimationFrame(animate);
          }, delayInit);
        }
      },
      { threshold: 0 }
    );
  }

  function animate(timestamp) {
    if (!animationRunning) {
      return;
    }
    if (!animate.start) animate.start = timestamp;
    elapsed = timestamp - animate.start;
    if (elapsed >= 20) {
      animate.start = timestamp;
      if (indexI < aiStrLength - 1) {
        let char = aiStr.charAt(indexI + 1);
        let delay = /[,.,。!?!?]/.test(char) ? 150 : 20;
        if (explanation.firstElementChild) {
          explanation.removeChild(explanation.firstElementChild);
        }
        explanation.innerHTML += char;
        let div = document.createElement("div");
        div.className = "ai-cursor";
        explanation.appendChild(div);
        indexI++;
        if (delay === 150) {
          post_ai.querySelector(".ai-explanation .ai-cursor").style.opacity =
            "0.2";
        }
        if (indexI === aiStrLength - 1) {
          observer.disconnect();
          explanation.removeChild(explanation.firstElementChild);
        }
        timeouts[0] = setTimeout(() => {
          requestAnimationFrame(animate);
        }, delay);
      }
    } else {
      requestAnimationFrame(animate);
    }
  }

  function clearTimeouts() {
    if (timeouts.length) {
      timeouts.forEach((item) => {
        if (item) {
          clearTimeout(item);
        }
      });
    }
  }

  function startAI(str, df = true) {
    indexI = 0;
    indexJ = 1;
    clearTimeouts();
    animationRunning = false;
    elapsed = 0;
    observer.disconnect();
    explanation.innerHTML = df ? "生成中. . ." : "请等待. . .";
    aiStr = str;
    aiStrLength = aiStr.length;
    observer.observe(post_ai);
  }

  async function aiAbstract(num = basicWordCount) {
    if (mode === "online") {
      await aiAbstractTianli(num);
    } else {
      aiAbstractLocal();
    }
  }

  async function aiAbstractTianli(num) {
    indexI = 0;
    indexJ = 1;
    clearTimeouts();
    animationRunning = false;
    elapsed = 0;
    observer.disconnect();

    num = Math.max(10, Math.min(2000, num));
    const options = {
      key: AIKey,
      Referer: AIReferer,
    };
    const truncateDescription = (title + pageFillDescription)
      .trim()
      .substring(0, num);

    const url = new URL(location.href);
    const pathSegments = url.pathname.split("/").filter(Boolean); // 过滤掉空字符串
    const id = pathSegments[pathSegments.length - 1]; // 获取最后一个部分

    const requestBody = {
      key: options.key,
      content: truncateDescription,
      url: id,
    };

    const requestOptions = {
      method: "POST",
      headers: {
        "Content-Type": "application/json",
        Referer: options.Referer,
      },
      body: JSON.stringify(requestBody),
    };
    try {
      let animationInterval = null;
      let summary;
      if (animationInterval) clearInterval(animationInterval);
      animationInterval = setInterval(() => {
        const animationText = "生成中" + ".".repeat(indexJ);
        explanation.innerHTML = animationText;
        indexJ = (indexJ % 3) + 1;
      }, 500);
      const response = await fetch(apiUrl, requestOptions);
      let result;
      if (response.status === 403) {
        result = {
          summary: "403 refer与key不匹配。",
        };
      } else if (response.status === 500) {
        result = {
          summary: "500 系统内部错误",
        };
      } else {
        result = await response.json();
      }

      summary = result.summary.trim();
      summaryID = result.id;

      setTimeout(() => {
        aiTitleRefreshIcon.style.opacity = "1";
      }, 300);
      if (summary) {
        startAI(summary);
      } else {
        startAI("摘要获取失败!!!请检查 AI 摘要服务是否正常!!!");
      }
      clearInterval(animationInterval);
    } catch (error) {
      console.error(error);
      explanation.innerHTML = "发生异常" + error;
    }
  }

  function aiAbstractLocal() {
    const strArr = postAI.split(",").map((item) => item.trim());
    if (strArr.length !== 1) {
      let randomIndex = Math.floor(Math.random() * strArr.length);
      while (randomIndex === lastAiRandomIndex) {
        randomIndex = Math.floor(Math.random() * strArr.length);
      }
      lastAiRandomIndex = randomIndex;
      startAI(strArr[randomIndex]);
    } else {
      startAI(strArr[0]);
    }
    setTimeout(() => {
      aiTitleRefreshIcon.style.opacity = "1";
    }, 600);
  }

  function aiRecommend() {
    indexI = 0;
    indexJ = 1;
    clearTimeouts();
    animationRunning = false;
    elapsed = 0;
    explanation.innerHTML = "生成中. . .";
    aiStr = "";
    aiStrLength = "";
    observer.disconnect();
    timeouts[2] = setTimeout(() => {
      explanation.innerHTML = recommendList();
    }, 600);
  }

  function recommendList() {
    let thumbnail = document.querySelectorAll(".relatedPosts-list a");
    if (!thumbnail.length) {
      const cardRecentPost = document.querySelector(
        ".card-widget.card-recent-post"
      );
      if (!cardRecentPost) return "";

      thumbnail = cardRecentPost.querySelectorAll(".aside-list-item a");

      let list = "";
      for (let i = 0; i < thumbnail.length; i++) {
        const item = thumbnail[i];
        list += `<div class="ai-recommend-item"><span class="index">${
          i + 1
        }:</span><a href="javascript:;" onclick="pjax.loadUrl('${
          item.href
        }')" title="${item.title}" data-pjax-state="">${item.title}</a></div>`;
      }

      return `很抱歉,无法找到类似的文章,你也可以看看本站最新发布的文章:<br /><div class="ai-recommend">${list}</div>`;
    }

    let list = "";
    for (let i = 0; i < thumbnail.length; i++) {
      const item = thumbnail[i];
      list += `<div class="ai-recommend-item"><span>推荐${
        i + 1
      }:</span><a href="javascript:;" onclick="pjax.loadUrl('${
        item.href
      }')" title="${item.title}" data-pjax-state="">${item.title}</a></div>`;
    }

    return `推荐文章:<br /><div class="ai-recommend">${list}</div>`;
  }

  function aiGoHome() {
    startAI("正在前往博客主页...", false);
    timeouts[2] = setTimeout(() => {
      if (window.pjax) {
        pjax.loadUrl("/");
      } else {
        location.href = location.origin;
      }
    }, 1000);
  }

  function subscribe() {
    startAI("正在前往订阅页面...", false);
    timeouts[2] = setTimeout(() => {
      if (window.pjax) {
        pjax.loadUrl("/subscribe/");
      } else {
        location.href = location.origin;
      }
    }, 1000);
  }

  function introduce() {
    if (mode == "online") {
      startAI(
        "我是文章辅助AI: SummaryGPT,点击下方的按钮,让我生成本文简介、推荐相关文章等。"
      );
    } else {
      startAI(
        `我是文章辅助AI: ${gptName}GPT,点击下方的按钮,让我生成本文简介、推荐相关文章等。`
      );
    }
  }

  function aiTitleRefreshIconClick() {
    aiTitleRefreshIcon.click();
  }

  function onAiTagClick() {
    if (mode === "online") {
      post_ai
        .querySelectorAll(".ai-btn-item")
        .forEach((item) => (item.style.display = "none"));
      document.getElementById("go-tianli-blog").style.display = "block";
      startAI(
        "你好 🎉!我是 dong4j 博客的 AI 文章摘要生成助理 SummaryGPT,一款基于本地部署的大型语言模型提供的生成式 AI 服务。我的主要职责是预生成和展示文章摘要。请注意,你无法直接与我交流。如果你也想拥有一个这样的文章摘要助手,请查阅下方的详细部署指南。"
      );
    } else {
      post_ai
        .querySelectorAll(".ai-btn-item")
        .forEach((item) => (item.style.display = "block"));
      document.getElementById("go-tianli-blog").style.display = "none";
      startAI(
        `你好 🎉,我是本站文章摘要生成助理 ${gptName}GPT,使用了预先生成的文章摘要。我在这里只负责摘要的显示,你无法与我直接沟通。`
      );
    }
  }

  function onAiTitleRefreshIconClick() {
    const truncateDescription = (title + pageFillDescription)
      .trim()
      .substring(0, basicWordCount);

    aiTitleRefreshIcon.style.opacity = "0.2";
    aiTitleRefreshIcon.style.transitionDuration = "0.3s";
    aiTitleRefreshIcon.style.transform = "rotate(" + 360 * refreshNum + "deg)";
    if (truncateDescription.length <= basicWordCount) {
      let param =
        truncateDescription.length - Math.floor(Math.random() * randomNum);
      while (
        param === prevParam ||
        truncateDescription.length - param === prevParam
      ) {
        param =
          truncateDescription.length - Math.floor(Math.random() * randomNum);
      }
      prevParam = param;
      aiAbstract(param);
    } else {
      let value = Math.floor(Math.random() * randomNum) + basicWordCount;
      while (
        value === prevParam ||
        truncateDescription.length - value === prevParam
      ) {
        value = Math.floor(Math.random() * randomNum) + basicWordCount;
      }
      aiAbstract(value);
    }
    refreshNum++;
  }

  function changeShowMode() {
    mode = mode === "online" ? "local" : "online";
    if (mode === "online") {
      document.getElementById("ai-tag").innerHTML = "SummaryGPT";

      aiReadAloudIcon.style.opacity = "1";
      aiReadAloudIcon.style.cursor = "pointer";
    } else {
      aiReadAloudIcon.style.opacity = "0";
      aiReadAloudIcon.style.cursor = "auto";
      if ((document.getElementById("go-tianli-blog").style.display = "block")) {
        document
          .querySelectorAll(".ai-btn-item")
          .forEach((item) => (item.style.display = "block"));
        document.getElementById("go-tianli-blog").style.display = "none";
      }
      document.getElementById("ai-tag").innerHTML = gptName + " GPT";
    }
    aiAbstract();
  }

  function showAiBtn() {
    if (mode === "online") {
      document.getElementById("ai-tag").innerHTML = "SummaryGPT";
    } else {
      document.getElementById("ai-tag").innerHTML = gptName + " GPT";
    }
  }
})();
当然还需要修改对应的 pug 模版文件(themes/anzhiyu/layout/includes/anzhiyu/ai-info.pug):
- let pageFillDescription = get_page_fill_description()
- let gptName = theme.post_head_ai_description.gptName
- let mode = theme.post_head_ai_description.mode
- let switchBtn = theme.post_head_ai_description.switchBtn
if (pageFillDescription && page.ai)
  .post-ai-description
    .ai-title
      i.fa-regular.fa-robot.fa-fade
      .ai-title-text 摘要助手
      if (switchBtn)
        #ai-Toggle 切换
      i.anzhiyufont.anzhiyu-icon-arrow-rotate-right
      i.anzhiyufont.anzhiyu-icon-circle-dot(title="朗读摘要")
      #ai-tag
        if mode == "online"
          = "SummaryGPT"
        else
          = gptName + "GPT"
    .ai-explanation AI 初始化中...
    .ai-btn-box
      .ai-btn-item 介绍自己 🙈
      .ai-btn-item 生成摘要 👋
      .ai-btn-item 推荐文章 📖
      .ai-btn-item 前往主页 🏠
      .ai-btn-item 前往订阅 💥
      .ai-btn-item#go-comment 前往评论 💬
      .ai-btn-item#read-audio Kokoro TTS 🎙️
      .ai-btn-item#go-tianli-blog 👀 部署教程
    script(data-pjax src=url_for(theme.asset.ai_abstract_js))
最后就是配置:
post_head_ai_description:
  enable: true
  gptName: Local
  mode: online # 默认模式 可选值: online/local
  switchBtn: true # 可以配置是否显示切换按钮 以切换 online/local
  btnLink: https://github.com/dong4j/blog-summary-assistant-server
  randomNum: 3 # 按钮最大的随机次数,也就是一篇文章最大随机出来几种
  basicWordCount: 1999 # 最低获取字符数, 最小1000, 最大1999
  apiUrl: # 文章摘要生成服务 api
  audioUrl: # 语音生成服务 api
  key: # 根据自己需要看是否要验证 key
  Referer: # 根据自己需要看是否要验证 Referer, 我这里没有验证
Hexo 修改没有多大难度, 主要是直接利用 anzhiyu 主题集成的 TianliGPT 来完成服务调用与数据展示, 所以这部分就见仁见智了, 个人可随意修改.
2. 摘要服务部署与集成
LLM API 直接使用 使用 Node.js 开发数字名片并集成 Chat 服务 这篇文章中已部署好的 one-api, 好处是不需要将厂商 Key 放在前端代码中, 可以避免一点的安全问题, 另外在 one-api 我可以随时添加 LLM 厂商服务, 且可控制指定 Key 的 Token 总量与有效期, 所以并不是太担心自己的 Token 被恶意使用, 即使第三方的 Token 被恶意消耗完, 我还可以使用本地部署 LLM 服务, 得益于 one-api 的代理功能, 简单的修改 one-api 配置即可使用, 不需要重新部署博客.
2.1 功能
- 提供一个
/api/summary接口给 Hexo 博客调用, 并将传入的博客内容通过 one-api api 传给 LLM, 并处理返回的结果; - 生成的文章摘要会被缓存到 Redis 中, 避免重复生成;
- 通过 pm2 启动服务;
- 提供自动部署脚本一键部署;
2.2 使用方法
git clone [email protected]:dong4j/blog-summary-assistant-server.git
cd summary-server
cp .env.template .env
修改 .env 配置:
SERVER_PORT=3000
# 缓存配置
REDIS_HOST=192.168.1.2
REDIS_PORT=6379
REDIS_PASSWORD=password
REDIS_DB=0
# 摘要过期时间
KEY_EXPIRATION=31536000

# LLM 服务
OPENAI_API_KEY=sk-*****
# 配置为厂商的 OpenAI API 地址
OPENAI_API_BASE=https://api.openai.com/v1
# 模型名称
OPENAI_MODEL=xxx
2.3 启动服务
npm install
npm run server
测试:
curl --request POST \
  --url http://192.168.1.3:3000/api/summary \
  --header 'Accept: */*' \
  --header 'Accept-Encoding: gzip, deflate, br' \
  --header 'Connection: keep-alive' \
  --header 'Content-Type: application/json' \
  --header 'User-Agent: PostmanRuntime-ApipostRuntime/1.1.0' \
  --data '{
    "key": "xxxx",
    "content": "HomeLab 先导篇:入门指南-开启你的个人云端实验室之旅前提说明, 什么是 HomeLab, 为什么选择自建 HomeLab, HomeLab 的原则, 硬件成本, 软件成本, HomeLab 的硬件, 网络架构, 自托管服务, 数据存储与备份, 总结中年男人的三大爱好充电头软路由这三大爱好不仅为我们的生活带来了便利也成为了我们生活的一部分作为一个软件开发者我一直梦想着拥有自己的服务器而和软路由则是我通往这个梦想的桥梁自从购买了我的第一台以来便打开了一扇新世界的大门即网络附加存储它不仅提供了一个安全的数据存储解决方案还让我能够实现数据的备份和共享随着时间的推移我陆续购买了其他硬件产品如软路由器服务器等逐步搭建起了属于我的今天我想和大家分享一下我搭建的过程希望能够帮助到那些同样有志于搭建的朋友在接下来的博客文章中我将详细介绍如何选购合适的设备软路由器以及服务器并分享我在搭建过程中遇到的挑战和解决方案并非遥不可及只要我们用心去探索和实践就能开启属于自己的个人云端实验室之旅让我们一起学习交流和成长共同打造一个属于我们的数字王国前提说明虽然关于的文章已经很多了但我还是想记录下自己搭建的经历和遇到的问题以及如何解决这些问题主要会涉及到以下几个方面先导篇我的概要硬件篇介绍我所拥有的硬件设备网络篇包括网络环境异地组网与网络安全服务篇使用搭建的各类服务数据篇包括数据存储方案备份方案和数据恢复方案数据同步构建高效的数据同步网络数据备份打造坚实的数据安全防线网络续集升级网络再战年内网穿透详解揭秘网络连接背后的奥秘什么是顾名思义就是家庭实验室它可以理解为家庭版的云服务器用来搭建各种服务比如个人网盘媒体服务器等等的硬件设备通常包括服务器可以是物理服务器或虚拟机用于搭建各类服务存储设备如和硬盘用于存储数据网络设备如软路由和硬路由用于管理网络其他设备如摄像头传感器等用于收集数据为什么选择自建对于我来说搭建是一种浪漫的折腾我的目标是搭建各种感兴趣的服务的实验室作为一个喜欢尝试新技术的人来说搭建各类服务非常有趣我可以快速尝试和验证新的技术和方案拥有一套自己的实验室可以让我更加自由地探索保证数据安全我对数据安全非常重视所以我会把所有的数据都存储在自己的服务器上而不是使用云存储服务这样可以保证我的数据不会被第三方控制我已经受够了七牛云的域名变更导致我大量图片无法访问更好的隐私保护家人的照片儿子的成",
    "url": "abbrlink.html"
}'
响应结果:
{
  "summary": "🤖 这篇文章介绍了: HomeLab的概念、自建HomeLab的原因、原则、硬件和软件成本、硬件设备、网络架构、自托管服务、数据存储与备份等。作者分享了自己搭建HomeLab的过程,包括选购设备、搭建过程中遇到的挑战和解决方案,旨在帮助有志于搭建HomeLab的朋友。文章还涉及了网络环境、异地组网、网络安全、数据存储方案、备份方案和数据恢复方案等内容,强调了数据安全和隐私保护的重要性。",
  "id": "abbrlink",
  "fromCache": false
}
第一次会调用 one-api api 生成摘要,第二次会从缓存中获取摘要。
2.4 部署
修改 ecosystem.config.js 相关配置:
module.exports = {
  apps: [
    {
      name: "summary-server", // 应用名称
      namespace: "blog", // 指定命名空间(可选)
      version: "1.0.0", // 应用版本(可选)
      cwd: "/path/to/deploy", // 部署到服务器的工作目录
      script: "./summaryServer.js", // 主脚本路径,相对于 cwd
      watch: true, // 是否启用文件监控
      ignore_watch: ["node_modules", "logs"], // 忽略监控的文件或目录
      exec_mode: "fork",
      instances: 1, // 应用实例数量
      autorestart: true, // 是否自动重启
      env: {
        VERSION: "1.0.0", // 设置版本号环境变量
      },
      log_date_format: "YYYY-MM-DD HH:mm:ss", // 日志时间格式
      error_file: "./logs/error.log", // 错误日志文件
      out_file: "./logs/out.log", // 输出日志文件
      merge_logs: true, // 是否合并日志
    },
  ],
};
修改 deploy.sh 脚本中的 DEFAULT_SSH_ALIAS 和 DEFAULT_REMOTE_DIR:
- DEFAULT_SSH_ALIAS: .ssh 中的 config 配置别名, 这里做了免密登录处理;
- DEFAULT_REMOTE_DIR: 部署到服务器的工作目录;
最后执行部署脚本:
./deploy.sh第一次部署需要在服务器的部署目录安装依赖:
npm install2.5 外网配置
家里的宽带有公网 IP, 所以我是直接部署到 HomeLab 的服务器上, 然后绑定绑定自定义域名即可, 假设绑定的域名为: https://summary.dong4j.tele:3000,
那么 Hexo 的 AI 摘要配置就要修改为:
post_head_ai_description:
...
apiUrl: https://summary.dong4j.tele:3000/api/summary
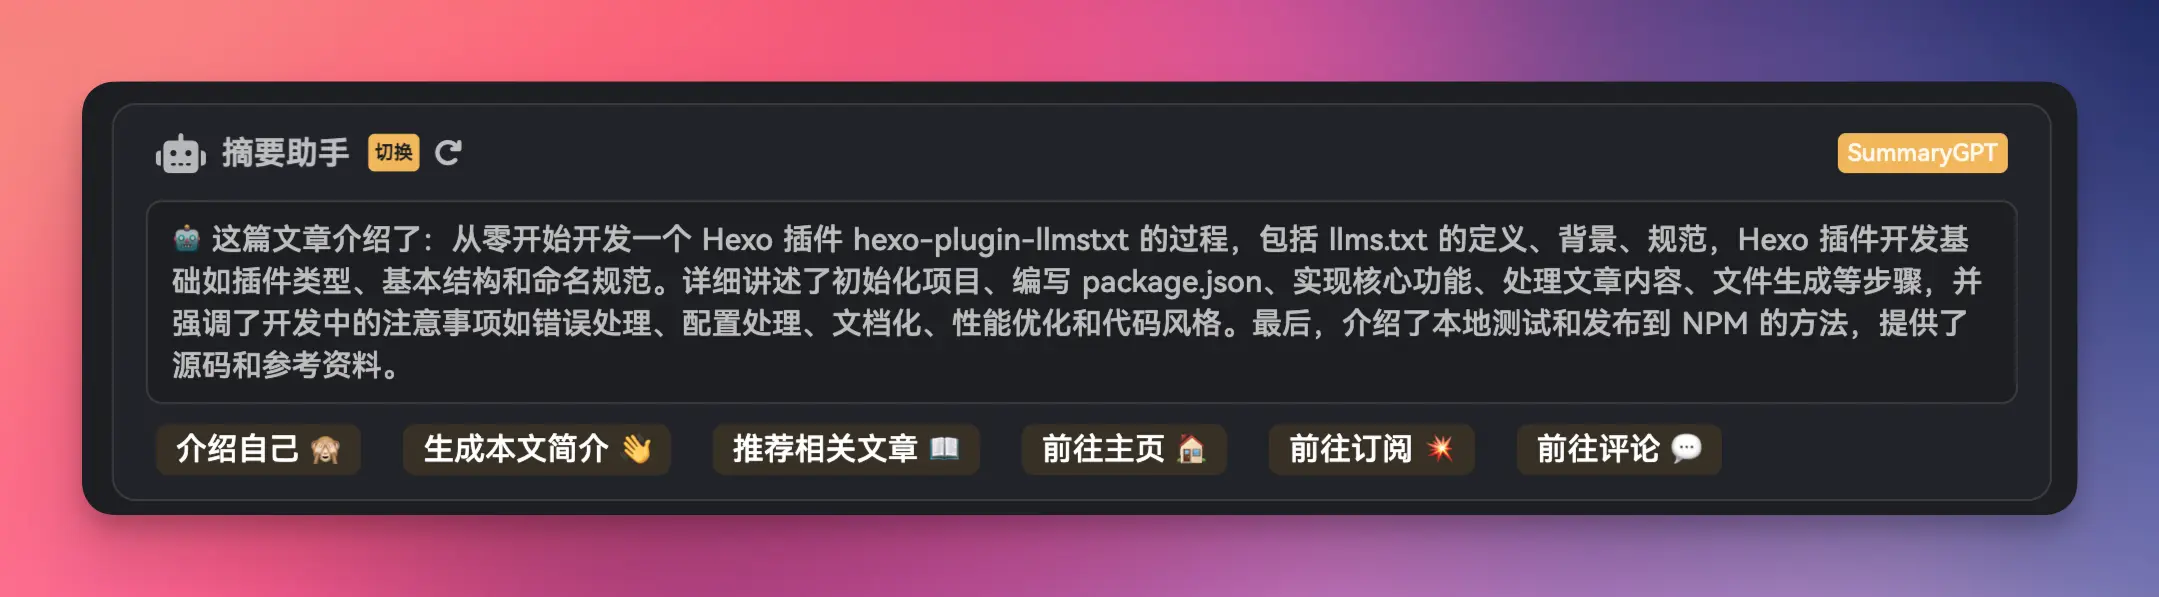
...效果如下:
3. Kokoro TTS 部署
3.1 部署
我使用的是 Kokoro-FastAPI, 使用 CPU 模式部署到 Mac mini M2 上:
git clone https://github.com/remsky/Kokoro-FastAPI.git
cd Kokoro-FastAPI

cd docker/cpu
docker compose up -d --build
不过最新的 0.2.0 版本使用 docker 部署还有一点 问题, 解决方法如下:
修改文件 docker/cpu/Dockerfile:
# Install dependencies and check espeak location
RUN mkdir -p /usr/share/espeak-ng-data \
    && apt-get update && apt-get install -y \
        espeak-ng \
        espeak-ng-data \
        git \
        libsndfile1 \
        curl \
        ffmpeg \
        g++ \
    && apt-get clean \
    && rm -rf /var/lib/apt/lists/* \
    && ln -s /usr/lib/*/espeak-ng-data/* /usr/share/espeak-ng-data/
应该先执行 mkdir -p /usr/share/espeak-ng-data.
如果你需要 web-ui 服务, 需要修改 docker-compose.yml, 删除 web-ui 服务的注释.
部署没问题的话, 应该能看到相关的容器:

3.2 切换语言
Kokoro-FastAPI 默认使用英语生成语音, 所以我们要修改一下代码来支持中文:
修改 api/src/services/tts_service.py 第 297 行:
# 将 lang_code 修改为 'z'
quiet_pipeline = KPipeline(lang_code='z', model=False)
然后重新使用 docker-compose 部署即可.
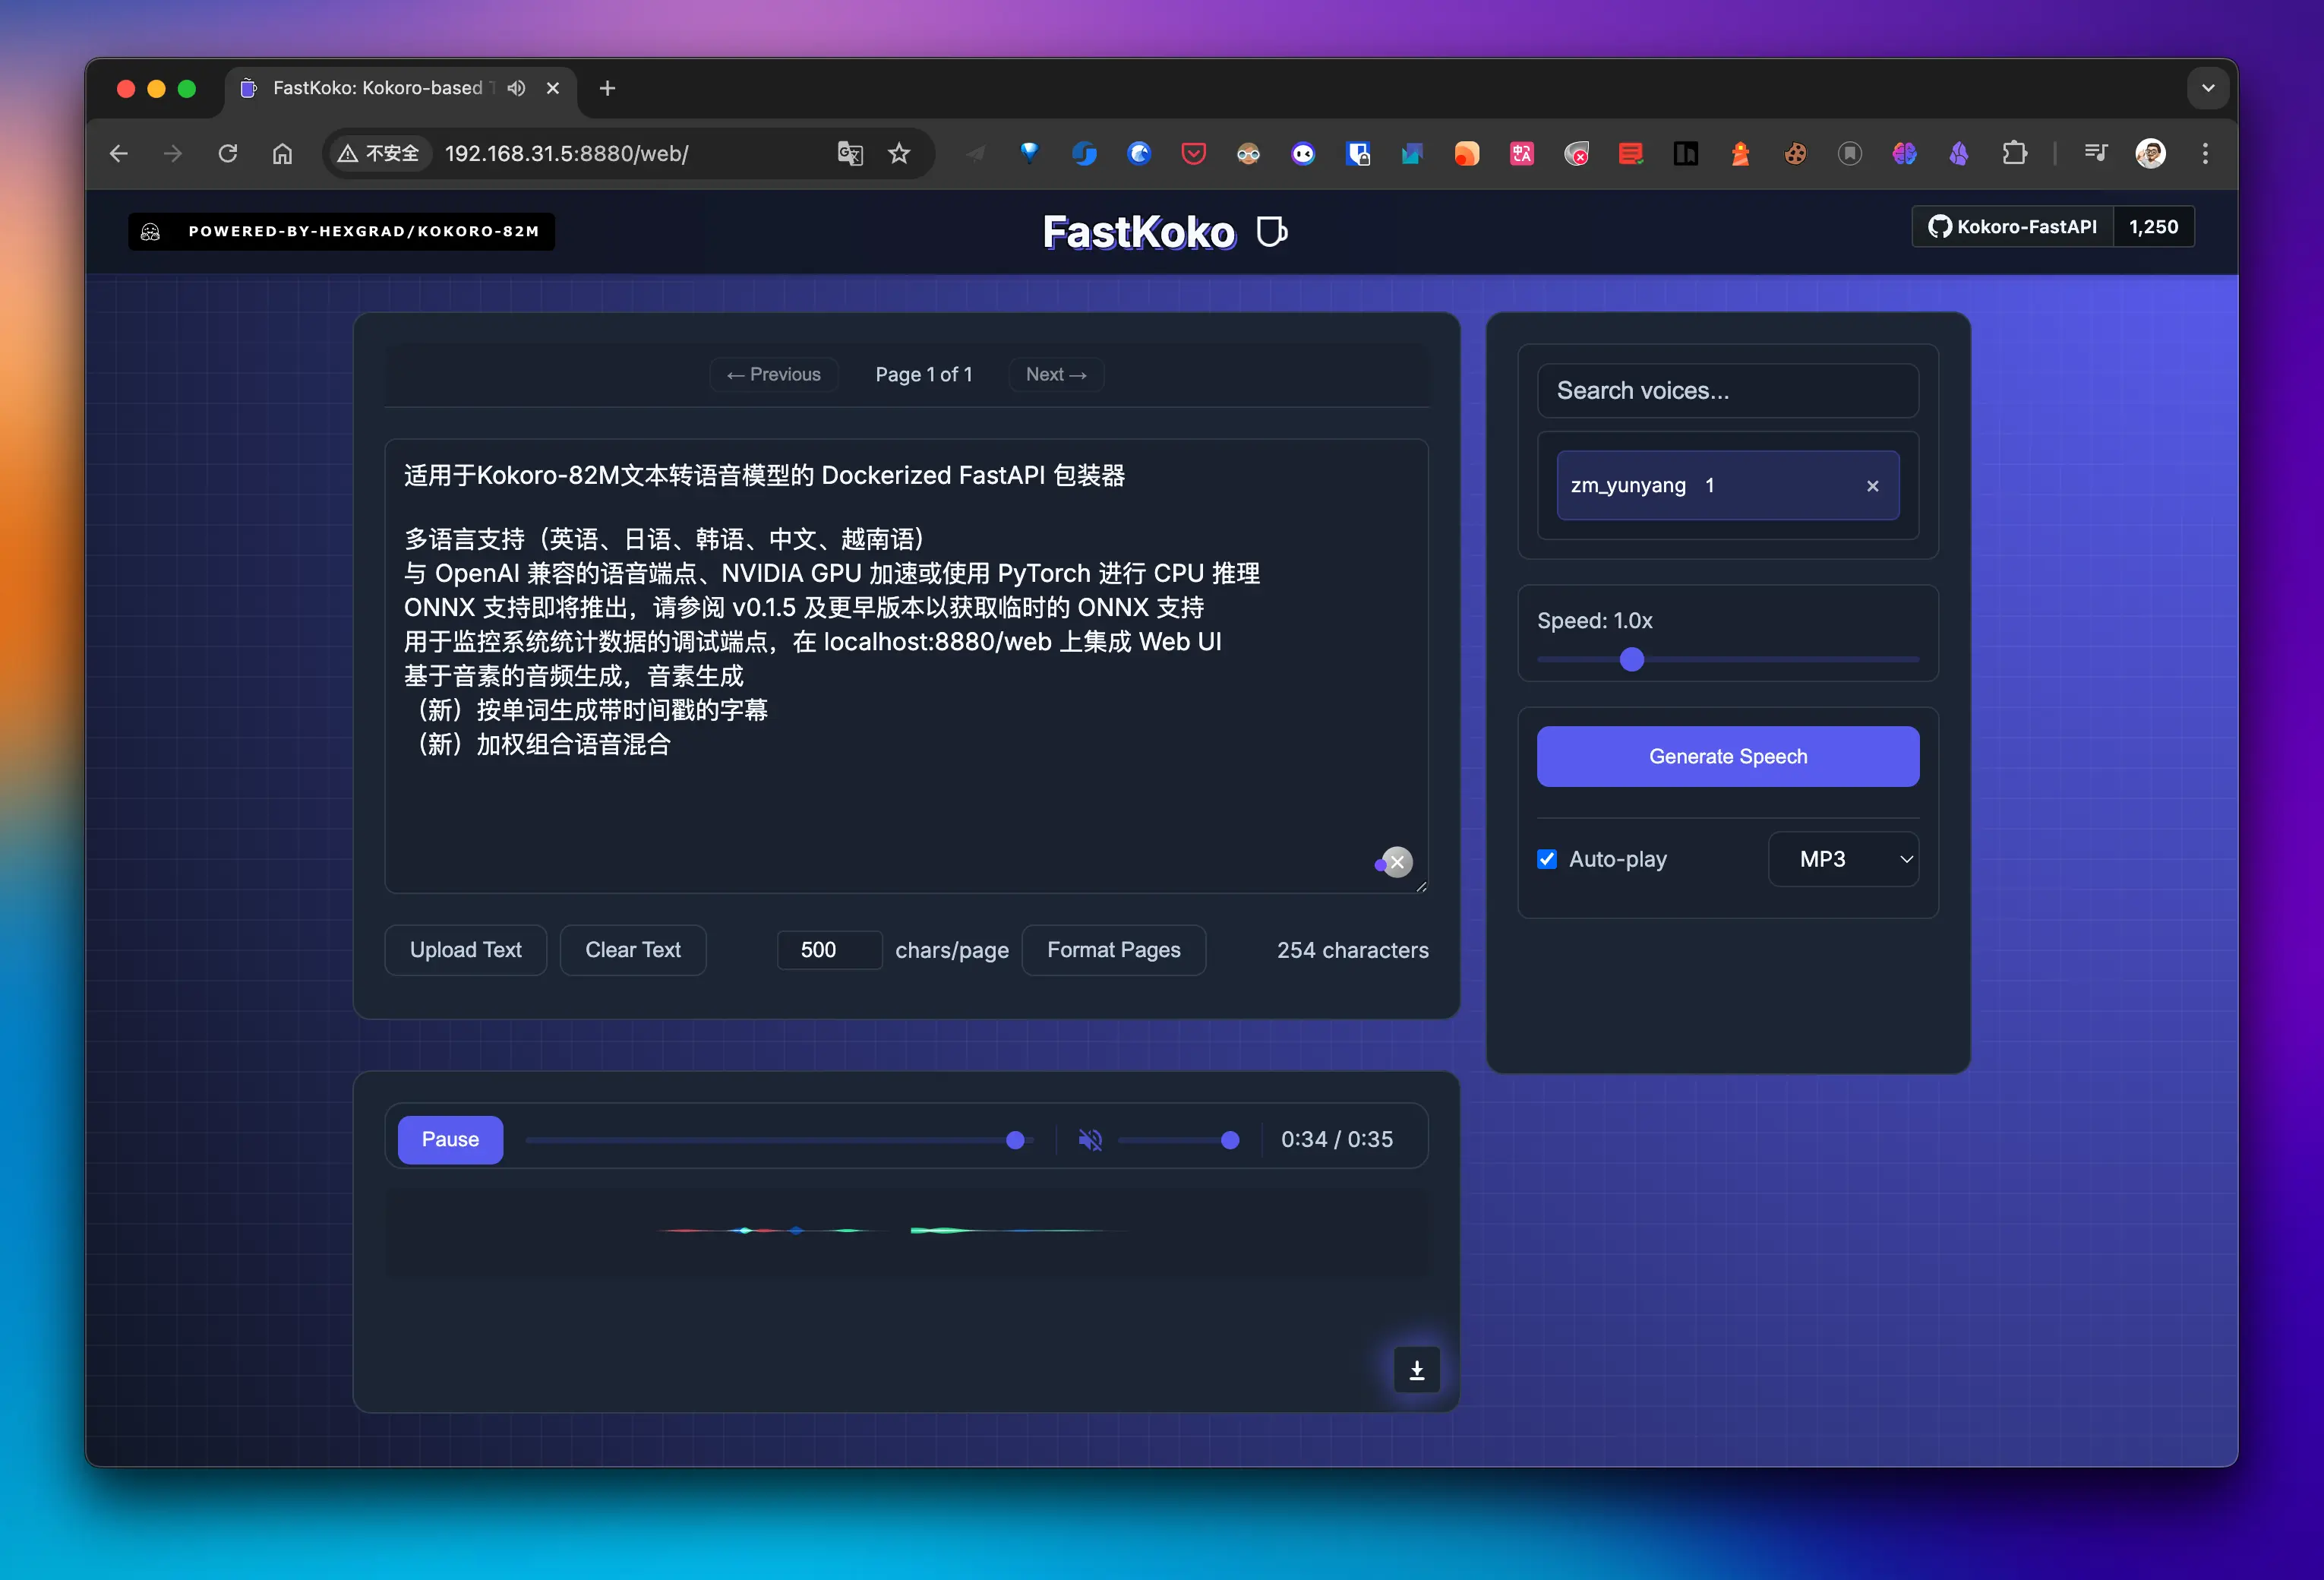
Gradio WebUI:
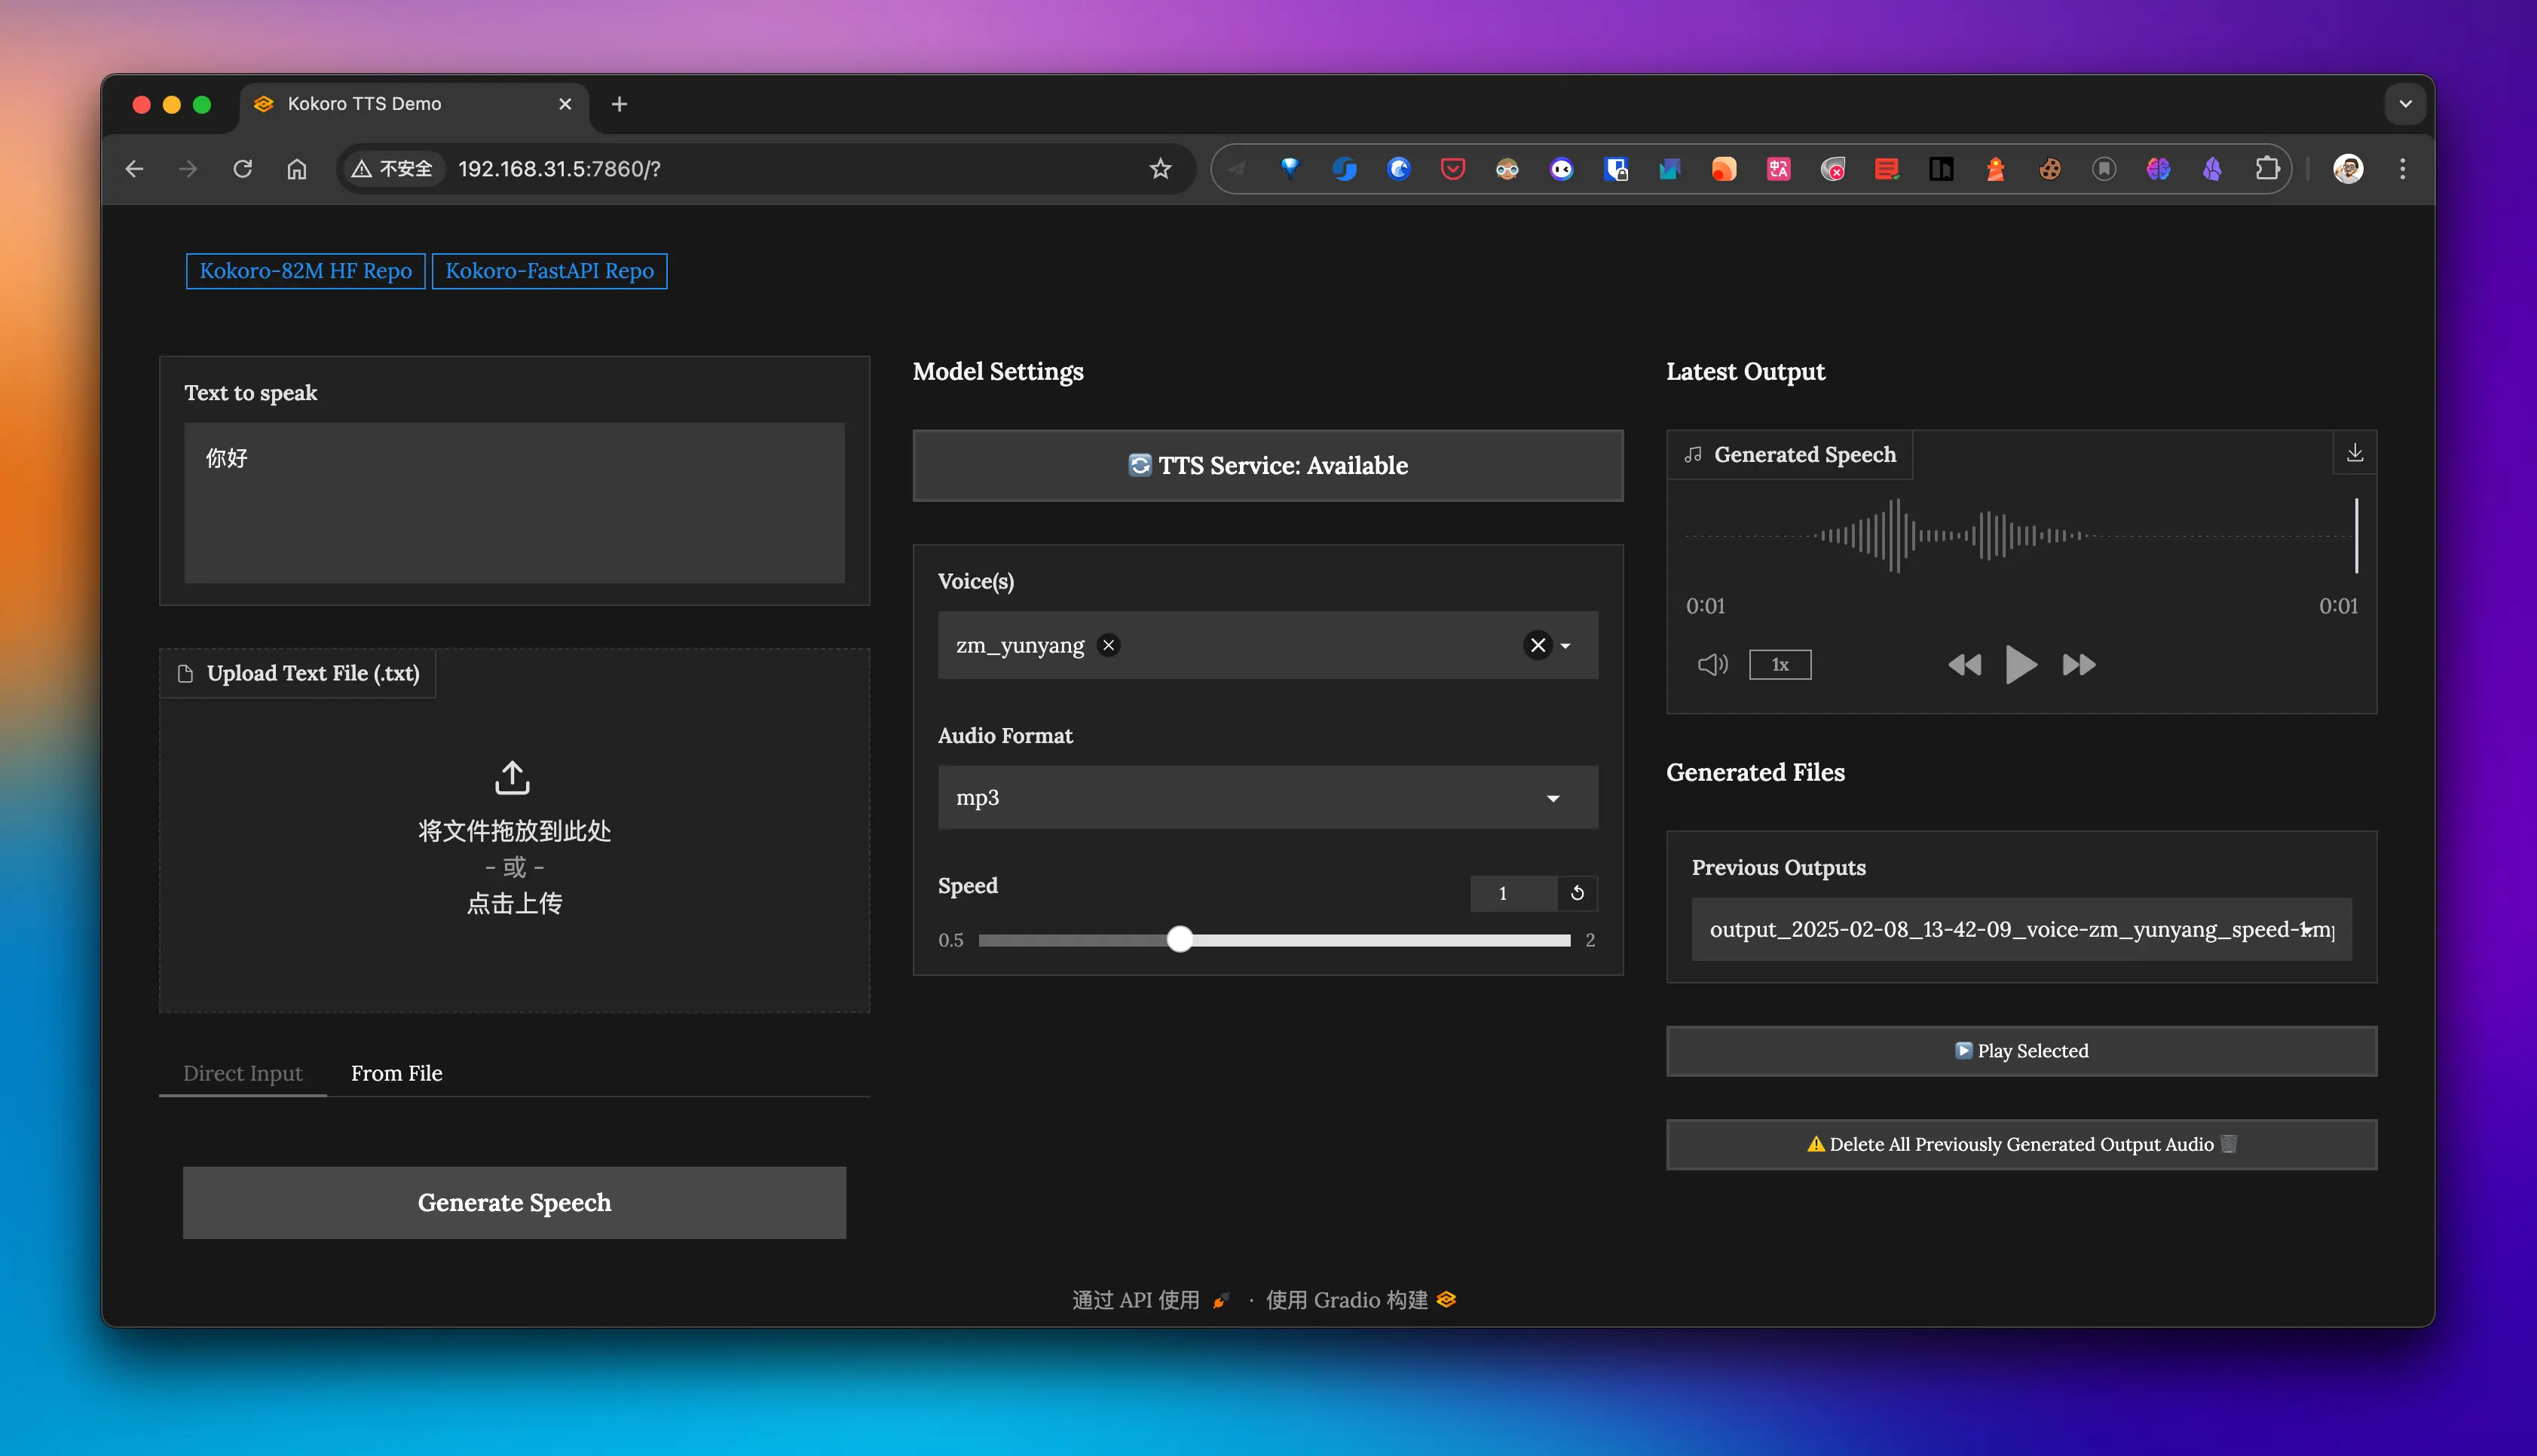
自带 WebUI:
3.3 停顿问题
如果使用中文标点服务会出现停顿时间较短的问题, 解决方法就是将中文标点服务修改为英文标点服务.
这个已在
audio-server处理过了.
3.4 中英文混合导致英语发音不正常
这个问题还没有解决.
4. 语音服务 API 部署与集成
4.1 功能
- 提供一个
/audio接口给 Hexo 博客调用, 通过 id 获取 Redis 中的摘要文本, 然后调用 Kokoro TTS FastAPI 生成语音; - 生成的 mp3 会保存到
audios 目录, 避免重复生成; - 通过 pm2 启动服务;
- 提供自动部署脚本一键部署;
4.2 使用
git clone [email protected]:dong4j/blog-summary-assistant-server.git
cd audio-server
cp config.ini.template config.ini
# 初始化 python 环境并安装依赖
python3 -m venv venv
source venv/bin/activate
pip install -r requirements.txt
修改 config.ini 中的配置信息:
[redis]
host=192.168.1.2
port=6379
password=password
db=0

[kokoro]
base_url=http://192.168.31.5:8880/v1
测试:
python kokorotts_with_request.py成功后会在 audios 目录下生成 mp3 文件, 如果音色不满意可以修改相关代码.
4.3 部署
修改 ecosystem.config.js 相关配置:
module.exports = {
  apps: [
    {
      name: "audio-server", // 应用名称
      namespace: "blog", // 指定命名空间
      version: "1.0.0", // 应用版本
      cwd: "/path/to/deploy", // 部署到服务器的工作目录
      script: "./audioServer.py", // 主脚本路径,相对于 cwd
      interpreter: "/mnt/4.860.ssd/audio-server/venv/bin/python3",
      watch: true, // 是否启用文件监控
      ignore_watch: ["__pycache__", "venv", "audios", "logs"], // 忽略监控的文件或目录
      exec_mode: "fork",
      instances: 1, // 应用实例数量
      autorestart: true, // 是否自动重启
      env: {},
      log_date_format: "YYYY-MM-DD HH:mm:ss", // 日志时间格式
      error_file: "./logs/error.log", // 错误日志文件
      out_file: "./logs/out.log", // 输出日志文件
      merge_logs: true, // 是否合并日志
    },
  ],
};
修改 deploy.sh 脚本中的 DEFAULT_SSH_ALIAS 和 DEFAULT_REMOTE_DIR:
- DEFAULT_SSH_ALIAS: .ssh 中的 config 配置别名, 这里做了免密登录处理;
- DEFAULT_REMOTE_DIR: 部署到服务器的工作目录;
最后执行部署脚本:
./deploy.sh第一次部署需要在服务器的部署目录安装依赖:
python3 -m venv venv
source venv/bin/activate
pip install -r requirements.txt
4.4 外网配置
假设绑定的域名为: https://audio.dong4j.tele:6668, 那么 Hexo 的 AI 摘要配置就要修改为:
post_head_ai_description:
  ...
  audioUrl: https://audio.dong4j.tele:6668/audio
  ...
效果如下:

{% audio https://cdn.dong4j.site/source/image/66ccb3f1.mp3 %}
三、注释事项
- 如果是部署到自己的服务器上, 需要在 Nginx 处理一下跨域的问题;